Running a storewide sale, clearing old inventory, or just launching your first Black Friday push? Applying a discount to every product in your WooCommerce store sounds like it should be a one-click job. It isn’t – at least not natively. WooCommerce’s default coupon system wasn’t built for automatic, sitewide pricing, and the bulk-edit trick breaks as soon as you have more than a few hundred SKUs.
This guide walks through the four methods that actually work – one free coupon method, one native bulk-edit path, and two plugin-based approaches. You’ll see exactly when to pick each one, where each one breaks, and how to avoid the margin trap moststore owners planning a WooCommerce storewide sale fall into. By the end, you’ll have a live discount on every product in your store and a way to keep it off the products you don’t want discounted.
Table of contents
- Which method should you use?
- Before you begin (Prerequisites)
- Method 1 – Storewide coupon (native WooCommerce, free)
- Method 2 – Bulk edit sale prices (native WooCommerce, free)
- Method 3 – Discount Rules plugin (free version, automatic)
- Method 4 – Discount Rules PRO for advanced conditions
- Will this hurt my margin?
- Troubleshooting – real fixes from merchant forums
- EU / UK stores – Omnibus Directive note
- Conclusion
- Frequently Asked Questions
Try it free before you commit to anything Most stores can run a full storewide sale using the free Discount Rules plugin – no paid license, no credit card. If you later need conditions like “first-order only” or tiered quantity rules, the Pro version adds them in the same dashboard.
Which method should you use?
Four working methods. Whether you call it a WooCommerce global discount, storewide sale, or sitewide discount, the setup is the same – but which method fits depends on store size and how much control you need:
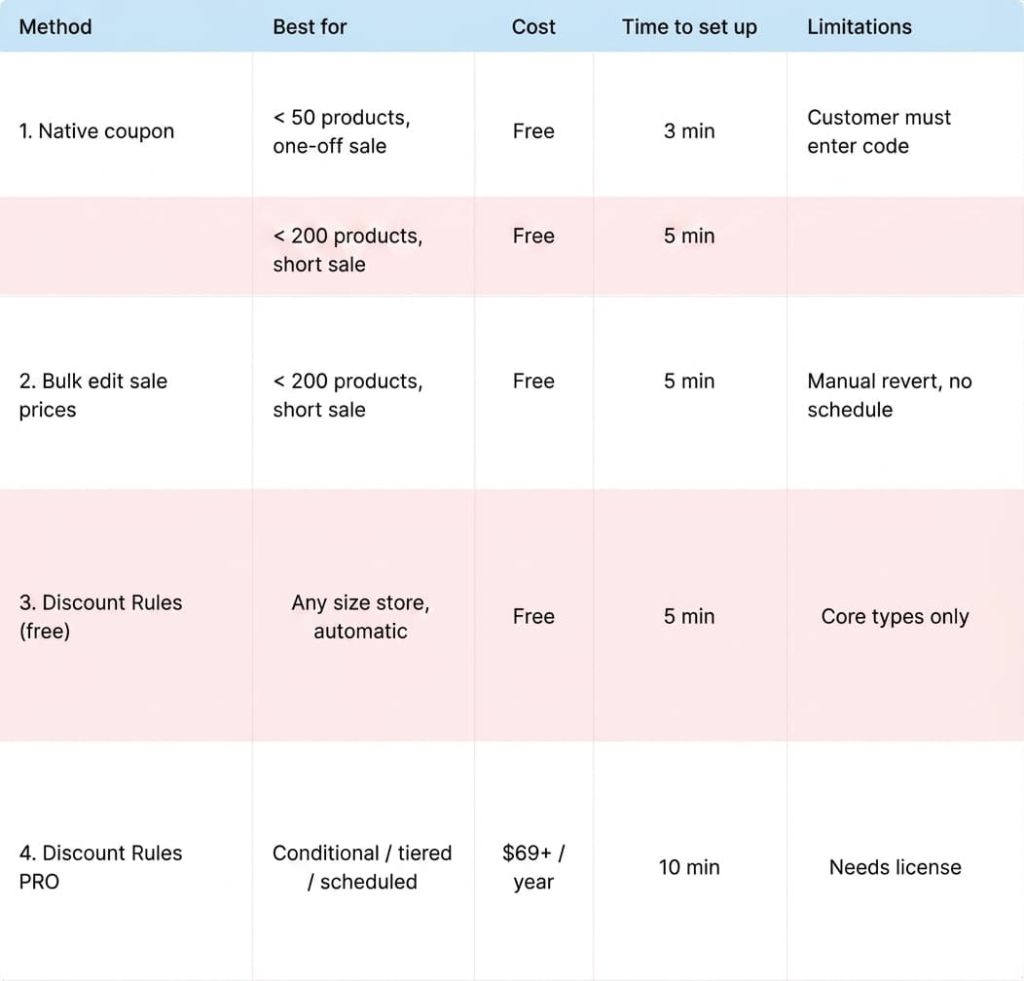
Alt-txt: Choosing best method to deploy
If your store has more than 200 products or you want the discount to appear automatically on every product page without a code, jump to Method 3.
Before you begin (Prerequisites)
Quick checklist before you start:
- WordPress 6.4+ running
- WooCommerce 8.0+ active
- Admin access to WordPress dashboard
- At least one published product (so you can verify)
- 10–15 minutes
- A cup of coffee (optional, strongly recommended)
For EU/UK stores, also skim the Omnibus Directive note near the end before publishing your sale – there’s a pricing-history rule that catches a lot of first-timers.
Method 1 – Storewide coupon (native WooCommerce, free)
When to pick this
Small store, one-off sale, you’re OK with customers typing a code at checkout. The native WooCommerce coupon system supports percentage and fixed-cart discounts out of the box, and applies them to the whole cart unless you restrict them.
Step 1: Create the coupon
Go to WooCommerce → Marketing → Coupons → Add coupon. Enter a code customers will actually remember (e.g., SPRING20, not DISC_V2_FINAL).
Expected Result: The coupon edit screen loads with Coupon data tabs (General, Usage restriction, Usage limits).
Step 2: Configure discount type and amount
Under Coupon data → General, set:
- Discount type: Percentage discount
- Coupon amount: 15 (for 15% off – no % sign needed)
- Allow free shipping: (optional)
- Coupon expiry date: Set if this is time-limited
Picking Percentage discount is what makes this a storewide rule – it applies to every line in the cart. Fixed cart discount only subtracts a flat amount from the cart total, which isn’t what you want here.
Expected Result: Discount type dropdown shows “Percentage discount” selected. Coupon amount field accepts the numeric value without error.
Step 3: Set usage restrictions (critical)
Under Usage restriction, leave Products and Product categories empty. Blank = applies to everything, per WooCommerce’s coupon behavior.
If you do not want the coupon to stack on items already on sale, check Exclude sale items. Most store owners miss this and end up giving a 15% discount on top of an existing 20% markdown.
Expected Result: Your coupon now applies to every product in the cart when the customer enters the code at checkout.
Step 4: Verify at the cart
Open an incognito browser window, add a few products, apply the code. You should see the percentage discount subtract from the cart total.
Expected Result: The cart shows a “Coupon applied” confirmation banner and the percentage discount subtracts from the subtotal.
What this method can’t do
The gap is big, and it’s why most stores move on quickly:
- Customers have to manually enter the code – no automatic storewide display
- No strikethrough pricing on product pages (regular price still shows)
- No sale badges
- No scheduled start/end beyond the expiry date
- Can’t target wholesale users, first-time buyers, or spend thresholds
WooCommerce’s own coupon management documentation confirms this: there is no core functionality to automatically apply coupon codes for customers. You’ll need to promote the code via email, banners, or a plugin.
If you need strikethrough pricing and scheduled starts, skip to Method 3 – Discount Rules plugin, or see our WooCommerce coupon setup guide for coupon-only options.
Method 2 – Bulk edit sale prices (native WooCommerce, free)
When to pick this
Under 200 products, short sale, no plan to repeat. The bulk-edit feature lives in Products → All Products and lets you reduce regular prices by a percentage in one shot.
Step 1: Bulk select + edit
Go to Products → All Products. Click the checkbox at the top of the product list to select everything on the page, then Select all X items that match this search.
Open Bulk actions → Edit → Apply. In the bulk-edit panel, find the Sale dropdown.
Pick Set to regular price decreased by (fixed amount or %) and enter your value – e.g., 10% for 10% off. Click Update.
Expected Result: Every selected product now has a sale price 10% below its regular price. Sale badges and strikethrough pricing appear automatically on the front end because WooCommerce treats these as native “on sale” products.
Why this breaks for most stores
If you have 500+ SKUs (Stock Keeping Units – one per unique product or variation), you’re paginating through the bulk-edit screen multiple times, and each run triggers a full product save – which can stall on shared hosting. Worse, when the sale ends, you have no “undo” button.
You have to run the reverse bulk edit (Set to regular price increased by 10%), which is inexact because 10% added back to a 10%-reduced price doesn’t return the original ($100 → $90 → $99, not $100).
This is the moment most WooCommerce store owners install a discount plugin. The official WooCommerce products management docs cover the bulk edit workflow in full. For stores past 200 SKUs, most merchants move to automatic discount rules, and Reddit’s r/woocommerce forum is full of threads where merchants realize they’ve lost 1% across their entire catalog because of this rounding problem – synthesized in our Reddit insights on WooCommerce discounts roundup.
Method 3 – Discount Rules plugin (free version, automatic)
When to pick this
Any store size, any product count. You want discounts to appear automatically on product pages, cart, and checkout – no code required.
This method uses Discount Rules for WooCommerce (free). It’s the most-installed WooCommerce discount plugin on WordPress.org, with an active user base that’s been growing steadily since 2017.
Step 1: Install and activate
From your dashboard: Plugins → Add New. Search for Discount Rules for WooCommerce.
Install and activate. A new WooCommerce → Discount Rules menu item appears.
Expected Result: “Discount Rules for WooCommerce” appears in your Plugins list as Active. A new Discount Rules submenu appears under WooCommerce in the admin sidebar.
Step 2: Create a Product Adjustment rule
Go to WooCommerce → Discount Rules → Add New Rule. Give it a descriptive title like Storewide 15% Off – Spring Sale.
Under Discount Type, pick Product Adjustment. This is the rule type that changes prices directly on product pages (strikethrough + sale badge + cart = all handled).
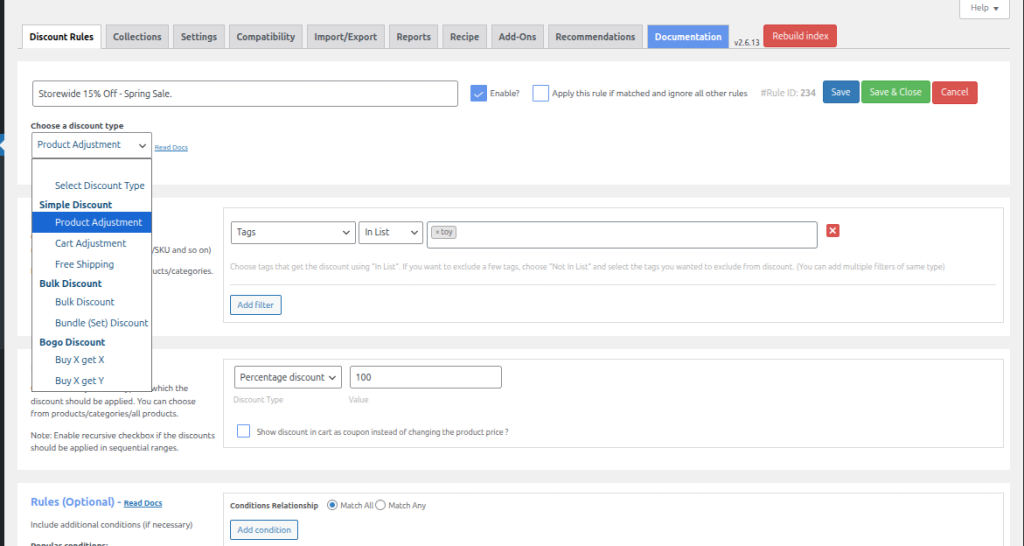
Expected Result: The rule editor loads with Filter, Discount, and Rules sections visible, and the Discount Type shows “Product Adjustment”.
Step 3: Select “All Products” in the Filter section
In the Filter section, the dropdown defaults to All products. Leave it.
That’s how you tell the rule to apply to every product in your catalog – this is the core move for any WooCommerce global discount.
If you want to later exclude specific items (e.g., keep new arrivals at full price), click Add filter, pick Category → Not in list, and select the category to exclude. Full steps in the how to exclude products from a storewide discount doc.
Expected Result: The Filter section displays “All products” and no exclusion filters are set.
Step 4: Set percentage or fixed value
Under Discount, choose:
- Discount Type: Percentage discount
- Value: 15
For a WooCommerce percentage discount all products setup, the value field accepts any integer or decimal.
Flip this to Fixed discount if you want a flat $5 off every item instead. Fixed price per item is the third option, which overrides the product price entirely with the value you enter.
Expected Result: The Discount section shows “Percentage discount” selected with your value populated in the input field.
Step 5: Save, enable, and verify
Click Save. Toggle the rule to Enabled.
Visit any product page in an incognito window – you should see the regular price crossed out and the 15% discounted price displayed next to it. Add to cart, head to checkout, confirm the subtotal matches.
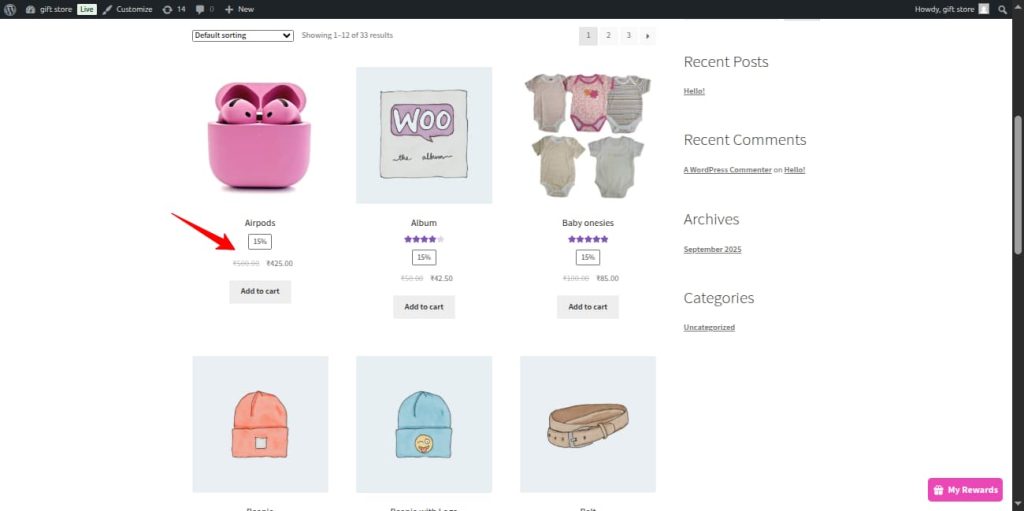
Expected Result: Every product in your store now shows a discounted price automatically – no coupon code needed. The rule runs until you disable it, or until the scheduled end date if you set one.
This is the simplest path to a WooCommerce global discount that applies without any customer action.
Editor’s note Between percentage and fixed discount, percentage scales better across mixed-price catalogs. A $5 fixed discount on a $10 product is a 50% price cut; the same $5 on a $200 item is 2.5%. Go percentage unless you specifically want the opposite effect (e.g., a “clear out all low-ticket items” campaign).
Need conditional or tiered rules on top of a storewide discount? The free version handles the 15%-off-everything case. If you need “15% off everything, but only for first-time customers” or “15% off all products + extra 10% when cart hits $200,” those combinations live in the Pro version.
Method 4 – Discount Rules PRO for advanced conditions
Sometimes a flat 15% off everything isn’t the right move. You want to apply it conditionally. Three scenarios come up constantly in support tickets:
Conditional storewide – first-order customers only
Apply 15% off every product, but only for shoppers placing their first order.
In the rule editor: set Filter = All Products, Discount = Percentage 15%, then scroll to Conditions → Add Condition → First Order → Yes. Save. The discount now only triggers for email addresses with zero previous orders. Full walkthrough in the WooCommerce first-order discount setup doc.
Tiered storewide – buy more, save more on everything
Instead of a flat percentage, let customers earn larger discounts as their cart grows:
| Quantity | Discount |
| 2–4 items | 5% off |
| 5–9 items | 10% off |
| 10+ items | 15% off |
Pick Discount Type = Bulk Discount, Filter = All Products, then add ranges. The bulk discount rules in WooCommerce doc has full screenshots.
Scheduled storewide – automatic start and end
For flash sales or holiday campaigns, scroll to Rule Limits inside the rule editor. Set a Start date/time and End date/time. The rule auto-activates and auto-deactivates – no need to log in at midnight to flip a toggle.
Reddit merchants in r/woocommerce regularly cite the scheduling feature as the single biggest reason they move from coupon codes to rule-based discounts, per our roundup of Reddit WooCommerce discount discussions.
Will this hurt my margin?
This is the question most blog posts skip. Applying a discount to every product means every unit you sell shrinks your gross margin – the question is by how much, and whether the volume lift makes up for it.
Here’s the math at a 40% starting gross margin (typical for ecommerce):
| Discount Applied | New Gross Margin | Break-even volume lift needed |
| 5% off | 35% | +14% orders |
| 10% off | 30% | +33% orders |
| 15% off | 25% | +60% orders |
| 20% off | 20% | +100% orders |
A 20% storewide discount needs your order volume to double just to keep the same dollar profit. That’s why most seasoned WooCommerce stores use conditional rules (first-order, minimum spend, specific user roles) rather than blanket discounts. Pair a smaller storewide discount with a cart-total condition (e.g., “10% off when cart is $75+”) to nudge average order value up while protecting margin.
Data from Baymard Institute shows the average cart abandonment rate is around 70%, and an enticing, visible discount is one of the strongest AOV (Average Order Value) levers – but only when it’s structured to lift purchase quantity, not just slice your margin. For a deeper framework on discount margin impact, see our WooCommerce discount pricing strategy guide.
Troubleshooting – real fixes from merchant forums
These five issues dominate r/woocommerce threads and WooCommerce support tickets for storewide discounts. Synthesized from Flycart’s Reddit multi-item discount analysis:
Problem 1: Discount not showing on product page
Symptom: The rule is active, but product pages still show the regular price.
Fix: You probably used Cart Adjustment instead of Product Adjustment. Cart-level rules only appear at the cart/checkout stage, not on product pages. Recreate the rule with Product Adjustment selected.
Problem 2: Variable product prices not updating
Symptom: The parent product shows the discount, but individual variations still show old prices when customers pick a variation.
Fix: Variable product pricing runs through AJAX (the browser request that updates prices without a full page reload), so the plugin must be configured to hook in. Under WooCommerce → Discount Rules → Settings → Display, enable Show discount on variable products. Details in the WooCommerce discount display settings doc.
Problem 3: Two rules applying simultaneously
Symptom: Customers are getting stacked discounts (e.g., 5% + 10% = 15%) when you only wanted one to apply.
Fix: Go to Discount Rules → Settings → General → Apply discount. Change from All matched rules to Biggest one from matched rules (or whichever strategy fits your campaign). Full logic in the set priority of WooCommerce discount rules doc.
Problem 4: Cached prices on the front-end
Symptom: Rule is live, but prices don’t update for logged-out visitors.
Fix: Exclude cart, checkout, and account pages from your page cache. In WP Rocket: Settings → Advanced Rules → Never Cache URLs → add /cart/, /checkout/, /my-account/. For WooCommerce dynamic pricing, also clear your object cache once after creating the rule.
Problem 5: Tax rounding mismatch at checkout
Symptom: Cart total is off by a cent or two vs. expected.
Fix: In WooCommerce → Settings → Tax → Rounding, check Round tax at subtotal level. Storewide percentage discounts can create fractional line totals that round inconsistently otherwise.
EU / UK stores – Omnibus Directive note
If you ship to the EU or UK, the Omnibus Directive requires you to display the lowest price from the 30 days prior to any promotion. For sitewide discount campaigns across the EU, compliance is non-negotiable – applying a storewide discount without showing the pre-sale price can trigger fines from local consumer-protection authorities.
Discount Rules PRO handles this automatically – enable the Omnibus setting under Settings → General. For manual methods (coupon / bulk edit), you’ll need to add a “Previous price” line to your product pages via your theme or a dedicated plugin. Full context in the Omnibus Directive configuration guide and the European Commission’s official guidance on Omnibus compliance.
Ready to run your first storewide discount? Most of what this guide covers is free. The plugin installs in under a minute, the first rule takes about three. If the storewide sale works and you want conditions like tiered pricing or first-order targeting, upgrading from the same dashboard saves you from re-learning a new tool.
Conclusion
Applying a discount to every product in WooCommerce is a solved problem – the question is which solution fits your store. A coupon works for a one-off sale under 50 products. The bulk-edit trick works for a short campaign if you don’t mind the rounding problem when you revert. For anything else – automatic storewide pricing, scheduled sales, conditional rules, variable-product handling – you’ll want Discount Rules for WooCommerce. The free version covers most percentage discount all products cases, and the Pro version adds conditions and tiered pricing when you’re ready. Whichever method you pick, run the margin math before you publish – a 20% storewide discount looks generous to customers but needs a 100% volume lift to break even on profit.
Frequently Asked Questions
These questions come up constantly when merchants start planning how to discount all products in WooCommerce – whether it’s a storewide sale, sitewide promotion, or a targeted conditional rule.
Install the free Discount Rules for WooCommerce plugin, create a new rule with Discount Type = Product Adjustment, leave the filter as All Products, pick Percentage discount, enter your value, and save. The discount appears automatically on every product page, cart, and checkout – no coupon code needed.
Yes, two ways. Use a coupon (WooCommerce → Marketing → Coupons) and leave product/category restrictions empty – customers enter the code at checkout. Or bulk-edit sale prices (Products → All Products → Bulk actions → Edit → set Sale to regular price decreased by X%). Both are free but lack automatic display, scheduling, and conditions.
In the Discount Rules plugin, click Add filter inside your rule, pick the exclusion type (Category, Product, Tag, or SKU), and choose Not in list. The discount applies to everything except your selection. Step-by-step walkthrough in the exclude products from a storewide discount doc.
Variable product pricing runs through AJAX when a customer selects a variation. If the discount isn’t updating, enable Show discount on variable products in Discount Rules → Settings → Display, and clear your page cache. The rule must use Product Adjustment (not Cart Adjustment) for variation-level pricing to respond.
The Product Adjustment discount type handles this automatically – the regular price displays with a strikethrough next to the new discounted price. If it’s not showing, check WooCommerce → Discount Rules → Settings → Display and make sure Show discounted price with strikethrough is enabled. More on strikethrough pricing in our WooCommerce discount strikethrough display guide.