For an online store, email plays a crucial part in its marketing. It is more important to add value to your customer’s inboxes through transactional emails. The more you engage with your customers, you will get a clear view of what is required and expected by them.
Nobody encourages boring and crappy emails to their inboxes. It is quite obvious that creativity is encouraged in all domains. Creativity can’t be set, the more you use, the more you gain. When you communicate creatively with your customers through customized emails, you are guaranteed to experience great results.
You can easily add your site visitors to your subscription list as an online merchant by creating attractive emails. The transactional emails can be customized for better revenue with the help of the WooCommerce Email Customizer Plugin.
WooCommerce Email Customizer with Drag and Drop Email Builder – Customizes color, header, footer, logo, link to your social network, and shortcodes to include dynamic data. Customizing an email with some special techniques can add great value to your message.
Continue reading to know more about customizing transactional emails for your WooCommerce store.
Before getting started, make sure you have installed and activated the popular WooCommerce Email Customizer plugin:
Table of contents
- Why Email Customization in WooCommerce is essential
- Benefits of Email Customization
- Editable Templates in WooCommerce Email Customizer
- Features of Drag and Drop Builder in WooCommerce Email Customization
- Installation of WooCommerce Email Customizer
- Create and Customize Interactive Transactional emails for your WooCommerce store
- Basic Settings in WooCommerce Email Customizer
- Retainful-Next Order Coupon
Why Email Customization in WooCommerce is essential
Brand value is the most important aspect of a business. As an online merchant, your store must sell more and look at its best. When all the features and activities of your store have equal participation for achieving your brand value, don’t you think the emails sent to your customers also have the same impact?
This can be achieved by customizing your transactional emails with the most effective plugin WooCommerce Email Customizer using Drag and Drop Builder. It has predefined email templates that can be imported and implemented as per the requirements.
The plugin supports multi-language and allows you to add dynamic information to your emails using shortcodes. Another interesting feature is that you can design your own template using custom CSS programmatically.
Benefits of Email Customization
WooCommerce Email Customizer helps you to build and customize transactional emails more effectively and effortlessly. The plugin upgrades the store’s email notifications with much more effective designs. The most important feature is that no duplicate emails will be sent. Your customers would find it aesthetically pleasing when they receive customized transactional emails to their inboxes, which would eventually increase your brand value.
Transactional emails act as a bridge of communication between you and your customers. These emails must be customized to make customers appealing to purchase from your store repeatedly. This can be completely achieved with the WooCommerce Email Customizer plugin.
Let’s us get to know the other benefits of the WooCommerce Email Customizer,
- As it has predefined templates, you would find it simple to create your transactional emails.
- The customized email template can be saved and reused whenever it is required.
- It is less time consuming as you need not start from scratch to build your emails.
- You are even allowed to style your own template with custom CSS
- Dynamic data can be included in your email with the help of shortcodes.
- It supports multi-language
- You will find it to be flexible when you create your emails.
- Even test mails are sent to have a preview of the email before sending it to your customers.
Editable Templates in WooCommerce Email Customizer
With the help of the WooCommerce Email Customizer we can customize the following email templates effortlessly:
- New Order – Sent when a customer places a new order.
- Canceled Order – Sent to the customer when they cancel an order that has been placed.
- Failed Order – Sent when the customer fails to do the payment for the order placed.
- Order-on-Hold – Contains the details after the placed order is on-hold.
- Processing Order – Sent once the customer completes the payment and it contains the order details.
- Completed Order – Sent to the customer once the order has been completed and it mentions that the order has been shipped.
- Refunded order – Sent to the customer when the orders are marked as refunded.
- Customer Invoice/Order details – It contains order details along with the payment links.
- Customer Note – To give any note to the store by the customer.
- Reset Password – Sent to the customer when they request a password reset.
- New Account – Account Sign Up page, sent to the customer for sign up at the time of checkout.
Features of Drag and Drop Builder in WooCommerce Email Customization
Drag and Drop Builder in WooCommerce Email Customizer helps you to customize your emails in a simple way. It is very flexible and handy to be implemented. It makes the transactional emails to be so interactive and informative that would make your customers come back to you.
Drag and Drop Builder allows you to add a logo, header, footer, images to your email template and makes it more attractive. You can also add your social links to your emails so that your customers can reach you easily.
The most important feature in drag and drop builder is it allows you to add Next Order Coupons to the transactional email by integrating Retainful with Email Customizer plugin. A dynamically generated coupon code can be provided to customers in their order notification email. This feature would engage your customers, to purchase more from you regularly which would eventually increase traffic and revenue for your store.
Installation of WooCommerce Email Customizer
Download and Install WooCommerce Email Customizer with Drag and Drop Builder in your WordPress Admin panel.
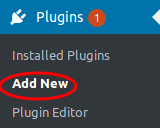
Step 1: Login to your WordPress dashboard click Plugins-> Add New as illustrated below,
Step 2: Click on “Upload Plugin”
Step 3: Click on “Browse” and select the Email Customizer plugin package.
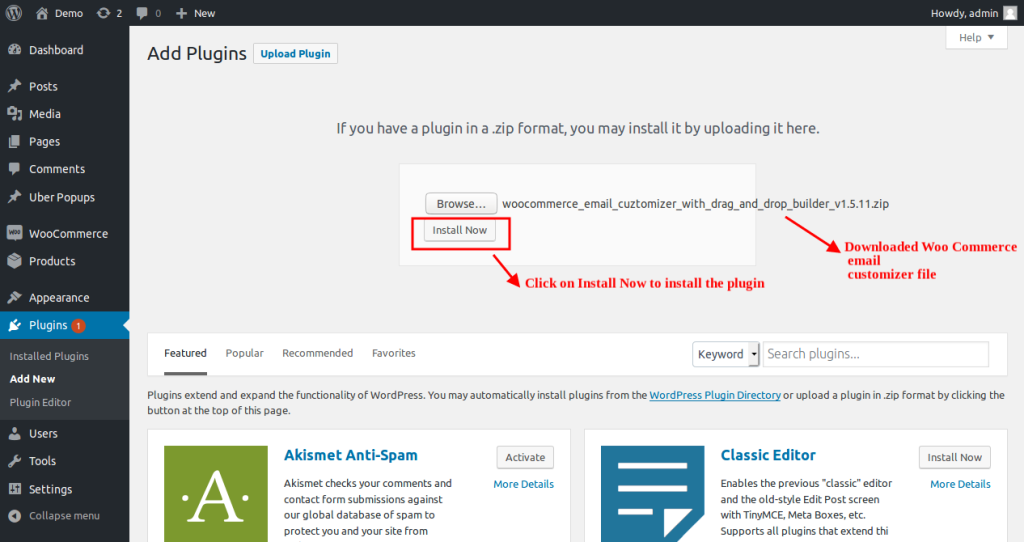
Hit the “Install Now” button to install the plugin to your dashboard.
Step 4: Click on the “Activate Plugin” button to finalize the installation process as illustrated below,
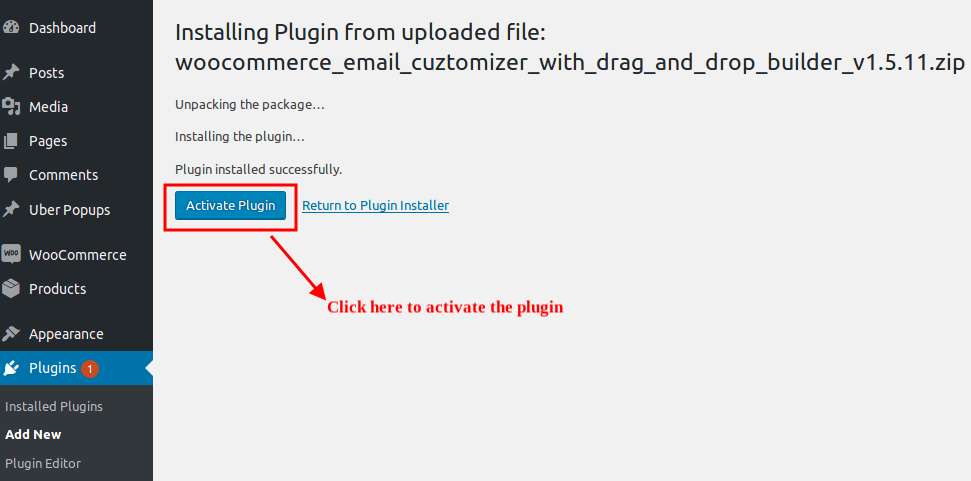
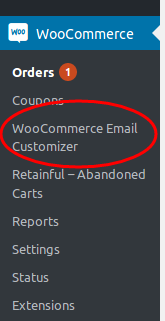
Once installed and activated in WordPress Dashboard,
Click on WooCommerce -> WooCommerce Email Customizer
To be more clear with the installation process, you can check the installation guide of the plugin.
Create and Customize Interactive Transactional emails for your WooCommerce store
Crafting Transactional emails for your WooCommerce store can be achieved using Drag and Drop Builder in the WooCommerce Email Customizer plugin. The customization of the email has three major parts,
- Header Section
- Body of the Email
- Footer Section
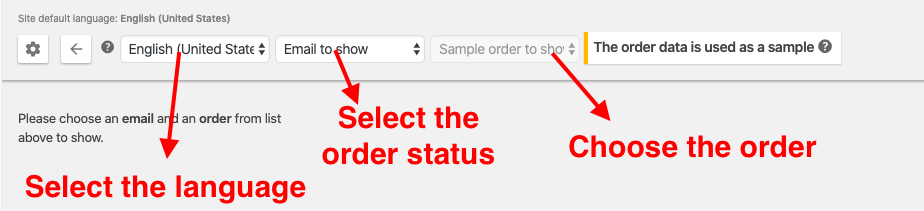
Select an order in the drag and drop email editor which can be considered as a sample template with dummy data. In this module let us get to know how to customize the transactional email with the WooCommerce Email Customizer.
The email editor allows you to select the language (as the plugin supports multi-language), the order status and the respective order as illustrated below. This is just for a real-time preview of your email design.
The Drag and Drop builder works like a page-builder where you can simply drag and drop image blocks, text blocks, paragraph blocks and also edit them as required.

Above are the drag-and-drop builder tools that are handy to customize transactional emails.
Let us have a detailed view of how these tools are implemented to build interactive, transactional emails.
Header Section
The header section of the email contains the logo, title, etc. Let us get to know how to build the header section for a Completed Order email.
Logo Image: To add your company’s / site’s logo
This is the top-most icon in the drag and drop builder. Drag and Drop the icon to insert the logo in your transactional email. Your own business logo can be edited and uploaded here.
Title and Subtitle: To add title and subtitle to your email
This icon is next to the logo image. Drag and drop this icon to insert title and subtitle to your transactional email. The text for this element can be edited in the text editor.
On mouse hovering each element, you can see the icons to delete/move/clone as illustrated above.
Divider: This icon is next to “Title and Subtitle” it is used to add a horizontal line between any two blocks.
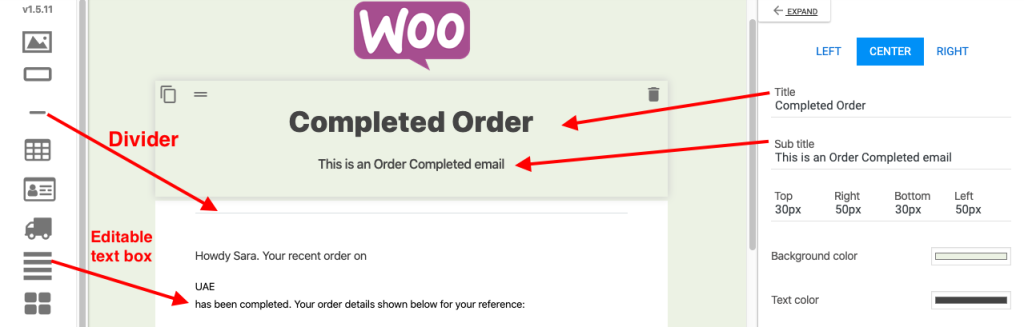
Editable text box: To add an editable text box inside the template.
This icon is after the “Shipping Address” icon, it can be used to add the required text anywhere in your template.
Body of the Email
The email body contains the order details, customer information, address details(billing/shipping), dynamic data, etc.
Order Item: It is to add the order details to the transactional email.
The order item icon is used to add data like the order number, subtotal, product details, total, shipping rate and payment method in a table format.
Here, you can modify the style of the table by changing the background and table color.
While editing the order table you can see it’s shortcode in the text editor(right panel) as shown above
Billing Address: To enter the billing address of the customer just drag and drop the icon,the shortcode can be viewed in the text editor.
Shipping Address: To enter the shipping address of the customer just drag and drop the icon, the shortcode can be viewed in the text editor.
Billing and Shipping Address: Displays billing and shipping address in 2 columns. The shortcode can be viewed in the text editor.
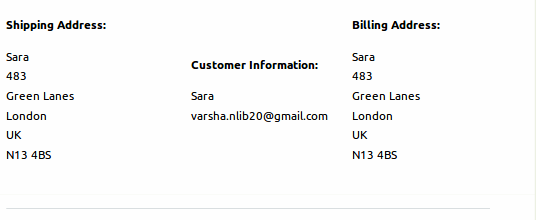
Billing, Customer details and Shipping Address: Displays billing, customer details, and shipping address in 3 columns as illustrated above. The shortcode can be viewed in the text editor.
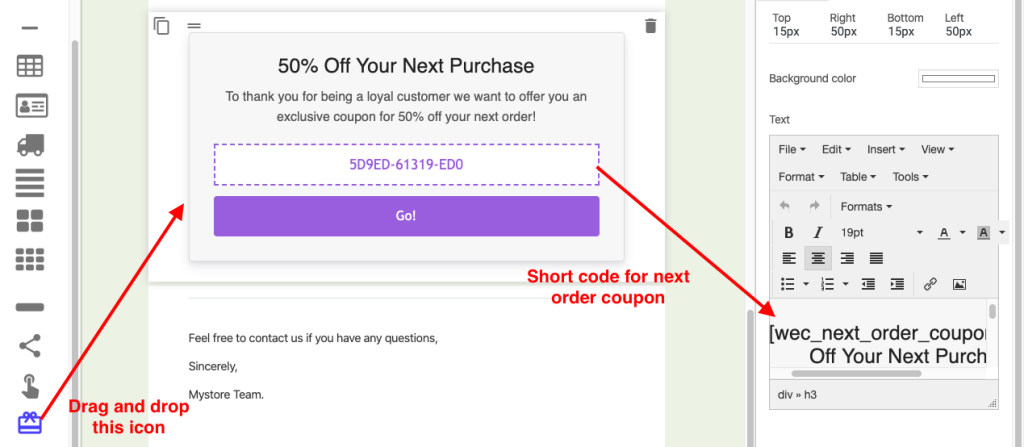
Next Order Coupon: This is the most creative feature in WooCommerce Email Customizer. This icon is used to add coupon code to the email template, which your customers can use for their next purchase. The next order coupon creates an intention to purchase regularly from your store to avail of the coupon codes. This also makes your email to be attractive and pleasing. If you need to enhance its details, you can use tools to remove background from images and achieve a clean, professional look.
Background Color: To change the background color of the email template.
Short Codes List: This icon is used to add shortcodes while editing any element.
For example,
[woo_mb_shipping_country] – To Get Shipping Country
The above shortcode can be added if you want the country of the shipping address to be displayed in your email.
In the WooCommerce Email Customizer, shortcodes are available in two places. One is at the top of the page near the Preview button. The other is the last icon in Drag and Drop builder.
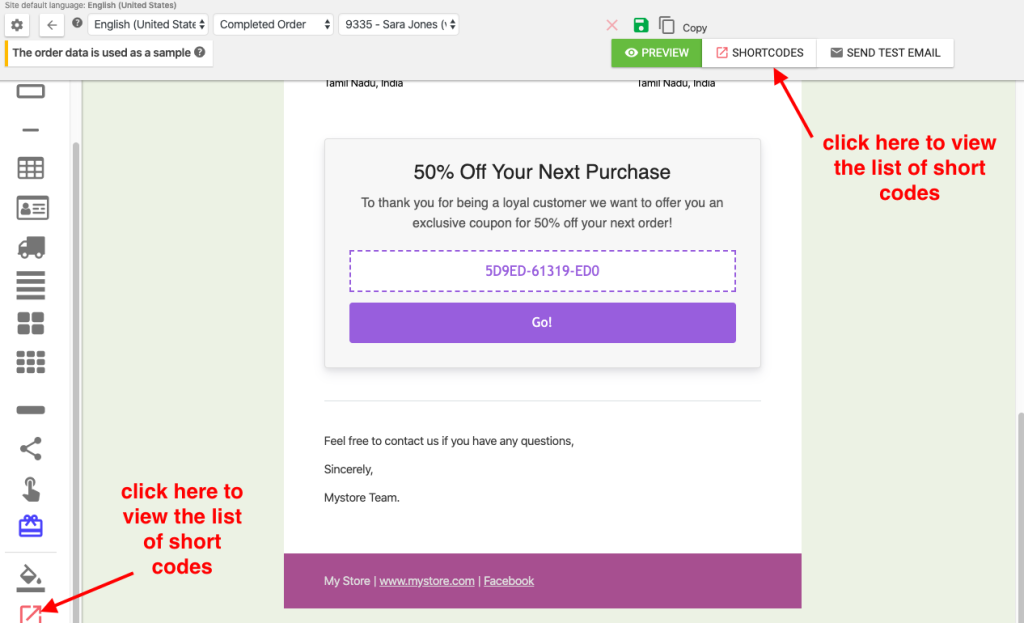
A list of shortcodes will be displayed as a popup by clicking any of these.
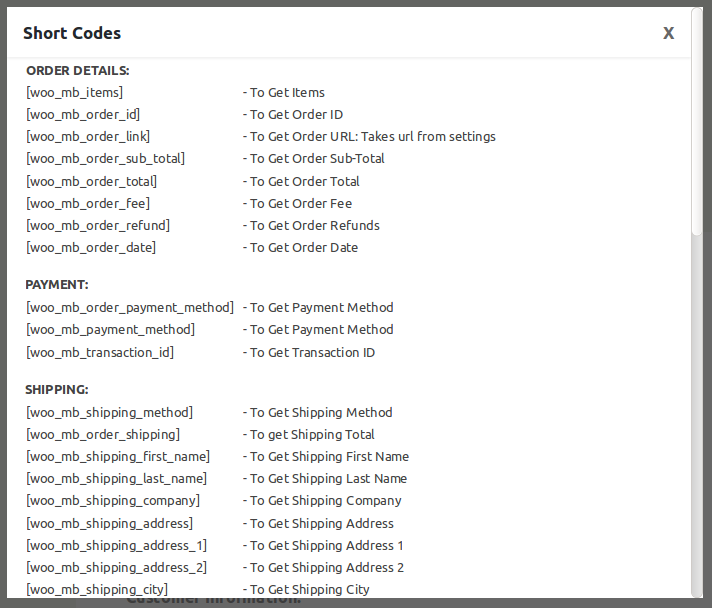
The list of shortcodes in the WooCommerce Email Customizer is as illustrated above. While you edit a particular element it’s respective shortcode will be included.
Custom Short Code: You can also create custom shortcodes to create the shortcodes to get the fields from a third-party plugin.
Footer Section
The footer section of the email contains an editable footer box, social icons, and clickable button. Let us get to know how to customize the footer section of the email.
Footer Block with Footer text: This is an editable footer box where you can include text like copyrights and disclaimers to your email which would add value to your transactional email.
Social Icons: Social icons are the key to spread your market widely. Here, you can add the following social icons – FaceBook, Twitter and YouTube.
Clickable URL Button: Drag and Drop this icon to the footer section of the email to add a button link to your URL. The text of the button can be edited as required. This icon is to add the subscription button to your template.
For example – “Click here for Subscription” or “Click here to subscribe for Newsletters.”
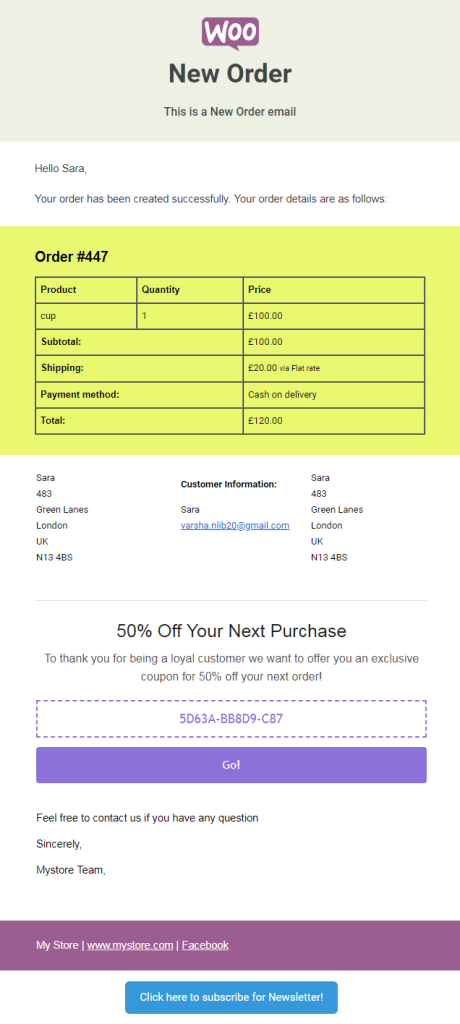
Once the email has been customized with the Drag and Drop Builder, it allows you to have a preview of the customized email before sending it to your customers. You also have a feature to send a test email in order to understand its functionalities.
The customized email for a Completed Order email is as illustrated below.
Basic Settings in WooCommerce Email Customizer
There are some basic settings that are to be taken care of before building a transactional email. The configurations can be done as per the requirements. The configurations done here will be reflected in your email templates (for example, order item table border color – the color chosen here will be reflected in your template).
Let us get in detail with the settings in WooCommerce Email Customizer
Click on the “Settings” icon which is at the top-left to configure the settings as illustrated below.
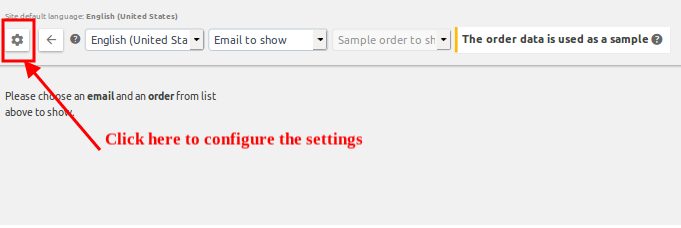
On clicking the above icon, will navigate you to the settings page,
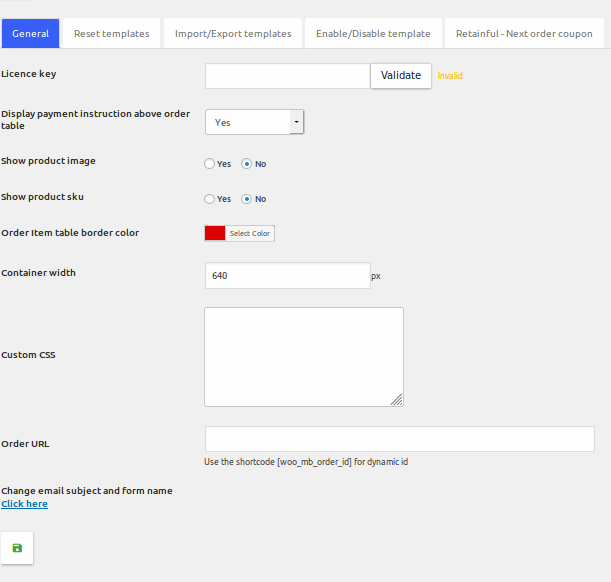
General Tab Settings
License Key – Validate your license key for future updates.
Display payment instruction above the order table – Here you can choose either to enable/disable the payment instructions above the order table.
Show Product image – To either enable/disable the purchased product image in the transactional email.
Show Product SKU – This option is valid only when you have added the SKU for the products created. This is either to enable/disable the SKU of the purchased product in the order details email.
Order Item table Border color – This is to select a border color for the order table if required. This is completely optional.
Container Width – Displays the width of the email container.
Custom CSS – You can design your own email template programmatically. Here, you can write your own customization with CSS.
Order URL – This is where you can enter the URL of the order page. This will direct your customer to the particular order page.
Once the required settings are done, click on the “save” button.
Reset Templates
In this tab, you can restore all the templates to the default style whenever required. This would remove all the customized settings done with drag and drop builder. Here, you are even allowed to reset any required template instead of resetting all the templates.
Click on the “Restore” button as illustrated above and hit the “Save” button to update the changes.
Import/Export Templates
This feature is really helpful as you can have a backup of the email templates in your drive. Click on “Export All Templates” to export the templates to your drive. The templates can either be customized or default email templates.
Click on the “Import” button to import the templates whenever required.
Enable/Disable Templates
This is to enable/disable the required email templates.
Retainful-Next Order Coupon
This feature will increase your store’s traffic by integrating Retainful with WooCommerce Email Customizer. This integration will allow you to add a coupon to your customer’s order email, making them feel more pleased to purchase from your WooCommerce store.
By clicking on the “Retainful-Next Order Coupon” tab you will be directed to the page in Retainful where some general settings are to be made for the coupons.
These settings will be reflected when you add the coupons to the transactional email with the help of Drag and Drop Builder in your WooCommerce Email Customizer.
To have a detailed study check the tutorial for Next Order Coupon.
I hope, WooCommerce Email Customizer will have a vital role in the increase in your revenue. The email customizer with its Drag and Drop Builder is very flexible in crafting the transactional emails which would add value to your customer’s inboxes.
The next order coupon, adding dynamic data using shortcodes are the attractive features that would definitely increase your store’s traffic and brand value.
Establish modernized WooCommerce emails today with the help of WooCommerce Email Customizer and experience great results.
Wishing You Good Luck.