You’ve probably seen the common “Sale!” badge while shopping online, but is it really enough to catch your customers’ attention and make them buy?
The answer is no. Today, with so many online stores competing, you need to personalize the text on your sales badges.
This blog explores all about WooCommerce sale badges and shows you how easy it is to customize the Sale text using a plugin called Discount Rules for WooCommerce. Here’s what you’ll find in this guide:
- Why customizing your WooCommerce sale badge text is important.
- Beyond “Sale!”: Explore different and effective sale badge text options that fit your brand and promotions.
- Showing the discount percentage: Find out how the “Discount Rules for WooCommerce” plugin can help show the discount percentage on the sale badge and get better visibility.
- Step-by-step instructions: Follow these steps to change your sale badge text in WooCommerce.
Change WooCommerce sale badge text with the Discount Rules plugin to grow sales
Table of contents
What Is A WooCommerce Sale Badge?
A WooCommerce sale badge is a visual indicator displayed on product images to inform customers that the product is currently on sale or has a discounted price. It is a promotional tool to attract attention and encourage potential buyers to take advantage of the discounted offer.
The sale badge typically includes text like “Sale” or “Discount,” it often incorporates visually appealing elements such as a percentage off or a specific amount reduced from the original price.
Examples Of WooCommerce Sale Badge Text
Sale badges can be displayed with different texts to meet different campaign requirements. Here are some of the most commonly used sale badge scenarios:
1. Limited-Time Offer Sale Badge
This type of Sale Badge tells the customer that the discount on a product is only available for a short period. Scheduled Sale Badge creates a sense of urgency in customers and encourages quick purchases.
You can use words like “Flash Sale,” “Hurry,” “Grab soon,” or “Limited offer” to indicate that the discount is only for a short time.
2. Seasonal or Promotional Sale Badge
The Sale badge indicates a sale in a particular season (Summer, Winter) and any promotion for a holiday sale or launch sale.
You can use words like “Black Friday Sale,” “Festive Offer,” “Easter Special,” or “Launch sale” to show that the discount is only for specific seasons.
3. Clearance Sale Badge
With this sale badge, customers can understand that the specific brand is clearing their stock. Hence, the products are available at discounted prices.
Words like “Clearance Sale,” “End Sale,” and “Last Chance Deal” show that the brand is about to clear the stock.
Why Change The Sale Badge Text In WooCommerce?
Changing the sale badge in WooCommerce with specific information is important, as it clarifies customer discounts and positively impacts their purchase decisions.
For example, with the simple word “Sale,” customers wouldn’t know what kind of sale is and how it benefits them. However, specific information like “Flash Sale” will definitely encourage customers to complete the purchase quickly.
Let’s discuss more benefits in detail.
- Gain Customer Attention: When you add a sale badge in WooCommerce with bright colors and the right words, customers’ attention easily falls on the product, encouraging them to purchase.
- Easy Shopping Experience for Customers: With a WooCommerce Custom sale badge, you can easily direct your customers to the products with discounts, making the shopping journey easy and smooth for them.
- Encourage Quick Purchases: Attractive sale badges with tempting words create a sense of urgency in customers, making them purchase before the products go out of sale.
- Get Repeat Purchases: Customers enjoy shopping with the indication of sale badges. They will have a memorable shopping experience, which in turn encourages them to return to the store for future purchases.
- Reduce Abandoned Carts: WooCommerce Sale badges can motivate customers to purchase impulsively. As a result, you can see a reduction in abandoned carts.
- Boost Conversions: For customers who are unsure what to purchase, a sale badge can be the push they need. Hence, it can easily help you increase conversions.
Customize your sale badge text easily with the Discount Rules plugin and direct your customers to discounted products to increase sales.
How To Show A WooCommerce Sale Badge?
You can show a WooCommerce sale badge using the default settings.
When a “Sale” price is added to a product’s regular price, the default “Sale” badge is automatically displayed on the product.
To add a product sale price and show a sale badge:
- Go to your WordPress Dashboard->WooCommerce->Products->All Products.
- Select the product that you want to add a sale badge.
- Scroll down to the product data section and go to the “General” tab.
- Add a Regular Price and a Sale Price.
- Update the Changes.
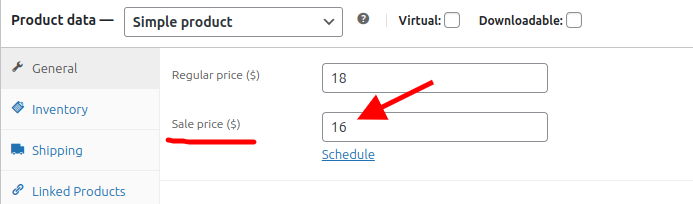
The product will now show a Sale Badge.
How To Change The Sale Badge Text In WooCommerce?
To change the Sale Badge Text in WooCommerce, install and activate the free version of “Discount Rules for WooCommerce -Pro,” as you cannot achieve this with default settings.
To change the WooCommerce sale badge text:
- Go to your WordPress Dashboard-> WooCommerce-> Discount Rules-> Settings.
- Scroll down to the “Product” Tab. You can see the “On-sale Badge” option. Select “Show on products covered under any discount rule plugin”.
- Now choose “Yes, I would like to customize the sale badge” in the customize sale badge option.
- In the “sale badge content” box, you can replace the word “sale” with the promotional word you want.
- Finally, Save the changes.
The sale badge text has been changed, and you can now display customized badge messages based on your campaign goal.
Tips For Effective Sale Badge Text In WooCommerce
A Sale Badge on WooCommerce can make you more profits when used correctly. Let’s look at a few tips that you can follow to increase its effectiveness.
- Use Clear Language: The goal is to make customers understand the discount at a glance. Hence, use catchy yet simple words to grab their attention.
- Use Bright Colours: Make the special offer unmissable with the bright color that you use. Bright colors like red or yellow can instantly attract customers.
- Highlight the Discount Percentage: Clearly display the discount percentage on badges. This can give customers a quick sense of how much they’re saving, which can lead to immediate purchases.
- Create a Sense of Urgency: You can use phrases like “Hurry Up” or “Limited Offer” to encourage quick purchase decisions. The fear of missing out makes customers shop with your brand.
- Maintain Consistency Across Products: It will be easy for customers to identify discounted products using a uniform sale badge with consistent design, color, and display position.
- A/B Test Different Sale Badge Text: You can test sale badges with different design & text variations to easily identify the most effective one.
- Track Sales and Conversion Rates: You can monitor how sale badges influence product sales. Then, make the required changes in the running or future campaigns to increase its impact.
Change sale badge text in WooCommerce using the Discount Rules plugin to enhance customer experience and increase sales.
Conclusion
Changing the sale badge text in WooCommerce might seem like a simple strategy, but it can increase sales significantly.
When you are consistent with this technique, your customers will enjoy shopping with your brand, build trust, become loyal, and make more purchases.
Using the free version of the “Discount Rules for WooCommerce” plugin, you can easily change the WooCommerce sale badge text.
What To Read Next?
- How To Display The Discount Percentage On The Sale Badge In Woocommerce?
- How to Add Discounts in WooCommerce?
- WooCommerce Coupons – The Complete Guide
Frequently Asked Question
A “Best Seller” badge is a visual indicator placed on product listings or images, signifying that the product is one of the top-selling items within a particular category, platform, or store.
A product badge is a small label typically placed on product images or listings to convey specific information about the product, such as discount offers, best-seller categories, or other features.
You can use the “Discount Rules for WooCommerce” plugin to add a product badge in WordPress.
1. After installing it, go to the plugin’s settings page.
2. From the “on-sale badge” option under the “Product” section, you can customize the sale badge with the message or information you want to display on the product.
3. Save changes.
From the simple “Sale!” badge to customized badge text, you can display different types of sale badges:
For a beginner in running an online store, you can simply add the sale price to the product to enable the default “Sale” badge.
To improve your store performance and customer experience, customize your badges in different ways like:
1. Create urgency with texts like “limited-time offer,” “offer ends up in a day,” and others.
2. Clearly communicate your discount offer with texts like “Buy One Get One Free,” “bulk discount,” and others based on the type of discount you provide for the product.
3. Highlight the type of sale for clarity with texts like “Christmas sale,” “holiday sale,” or “clearance sale.”
4. Display discounted prices to increase sales impact with texts like “5% off,” “Save $10,” and more.