Are you trying different ways to increase your average order value, but none works well? You are probably missing the WooCommerce order bump strategy!
Order bumps are one of the proven and effective methods to increase the average order value of each purchase.
Imagine shopping with a child in a physical store. At the checkout, the cashier offers chocolates from the counter—a real-time order bump.
This strategy encourages customers to add more to their cart, boosting their average cart value. WooCommerce stores use a similar approach with checkout order bump offers.
In fact, reports state that order bumps can boost AOV by 10%-30%. Without a doubt, it is one of the reliable approaches to increase your average transaction value.
In this blog, you’ll learn:
- How to add order bumps to checkout pages using a plugin.
- The secret formula to creating a converting bump offer.
- Real-life examples and best practices for effective upselling at checkout.
- And the ideas to start your checkout upselling campaign.
Let’s start.
Create Order Bump Offers Easily With WooCommerce Upsell & Order Bump Plugin and Increase Your Average Order Value.
What is WooCommerce Order Bump?
A WooCommerce order bump is an add-on upsell offer presented to customers during the checkout process in a WooCommerce-powered online store.
It helps increase the average order value of each sale by offering customers an additional, related product at a discounted price alongside their main purchase.
Online store owners utilize this strategy within their WooCommerce sales funnels to enhance their sales and encourage customers to buy more items.
Example of WooCommerce Order Bumps
An example of WooCommerce order bumps involve offering customers a discounted laptop bag when they purchase a laptop. This can increase the average order value by 20%, equivalent to an extra $50 in revenue.
It works because the affordable add-on complements the main purchase, prompting customers to include it in their order and boosting the store’s average transaction value.
WooCommerce Order Bump vs Upsell – What’s the Difference?
WooCommerce Order bump and upsell are two effective strategies to increase the average cart value of the WooCommerce store. Though both terms have the same goal of increasing order value, they have differences in how and where they work.
Let’s see the differences between order bump and upsell in brief:
- Primary Purpose
- The primary goal of order bumps in WooCommerce is to enhance customers’ purchase value with a low-cost product offer.
- The main goal of upselling in WooCommerce is to encourage customers to spend more on a higher product version than their original product.
- Offer Placement
- Order bump WooCommerce offer is one of the One-click upsell tactics that is usually displayed during checkout and customers can easily add the offer in a click before completing the checkout payment process.
- If you may not know, upsell offers in WooCommerce are placed on different places like product, cart, checkout, and thank-you pages to recommend the higher version of the product when customers intend to purchase the main product.
- Offer Cost
- Order bumps are low-cost offers that complement customers’ primary purchases.
- On the other hand, upsells are expensive offers that suggest a higher version of the customers’ main product from the same or different brand.
- Customer Decision
- Customers can quickly decide the need for an order bump offer as it is a low-cost, straightforward offer and aligns with the primary purchase.
- However, customers can delay their decisions on upsell offers as it costs more than they actually plan.
Overall, the purpose and placement of order bumps and upsells are different, but they have the same end goal of increasing the purchase value of every sale.
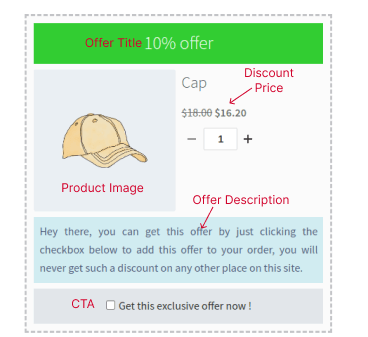
The 5-Step Formula to Design a Converting WooCommerce Order Bump Offer
Here is the template to create an attractive and converting order bump WooCommerce offer.
The five-step formula includes:
- Offer Title
An attention-grabbing title is necessary to catch customers’ eyeballs.
For example: 10% offer, One-Time Offer, or Limited Time Offer.
- Offer Description
A short and persuasive offer description explaining the product usage or how it complements the primary purchase is helpful to complete the sale.
- Offer CTA
An actionable CTA with a check box helps customers add the order bump offer to their cart within a click.
For example: Get this offer now, Yes! Add it to my order, Buy Now, and more with a simple click box.
- Offer Price
Display both regular and discounted prices and show how much a customer has saved with this offer.
- Offer Image
It is optional. You can include a product image to increase offer visibility.
Check the image reference of the order bump WooCommerce template:
Is It Necessary to Add an Order Bump at Checkout?
Adding an order bump during checkout will bring you benefits in many ways. Here are some of those reasons to use order bumps for your WooCommerce store:
- Increase Average Order Value (AOV): By suggesting additional products to your customers at the WooCommerce checkout page, you encourage them to spend more on your store, increasing Average Order Value (AOV) and profitability.
- Boost Conversion Rate: If you offer the right product recommendations that complement the customer’s primary product or align with their interests, they will likely purchase it. It will increase the conversion rate of your WooCommerce checkout page.
- Elevate Shopping Convenience: The one-click opt-in nature of WooCommerce order bumps is more convenient for customers to add products within a click. They don’t need to navigate other pages to add products.
- Enhance Shopping Experience: When customers see the offer as a discounted item or product bundle, they think they are getting a good deal. It creates more value for their shopping and motivates them to accept the order bump WooCommerce offers.
- Limit Purchase Decision: Unlike offering more products through cross-sell and upsell strategies, WooCommerce order bump focuses on one strategic offer. It helps customers to limit their decisions and complete their purchases.
- Showcase New Products: Order bump offers can also display new products. You can use this chance to show new products or slow-selling items in your store.
How to Add a WooCommerce Order Bump?
By default, WooCommerce only allows you to create upsell and cross-sell offers and does not provide the option to create order bump offers.
That’s why a plugin like UpsellWP will help you create an order bump WooCommerce offer.
For this illustration, we will use this WooCommerce order bump plugin to create two scenarios. Check this detailed installation guide to install and activate the order bump plugin to your WooCommerce/ WordPress website.
Scenario 1: Offering discounted price as an order bump
For example, 50% off on Cap when customers purchase a T-shirt.
To create a discounted order bump offer:
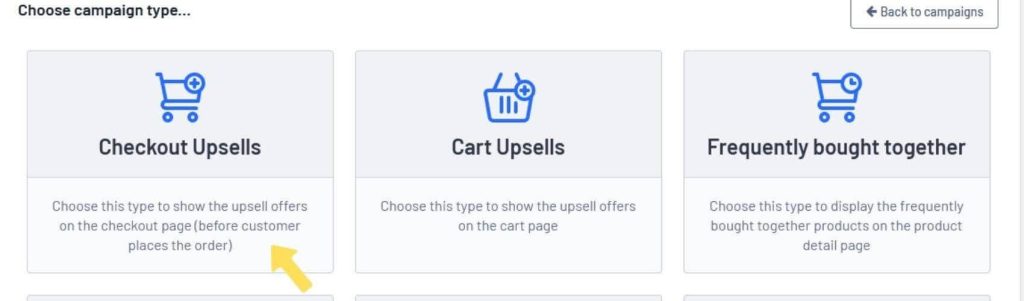
1. Go to Your WordPress dashboard -> UpsellWP (Checkout Upsell)-> Campaigns. Click “Create New Campaign” to create a WooCommerce order bump offer.

2. Now Choose Campaign Type as ‘’Checkout Upsells.’’
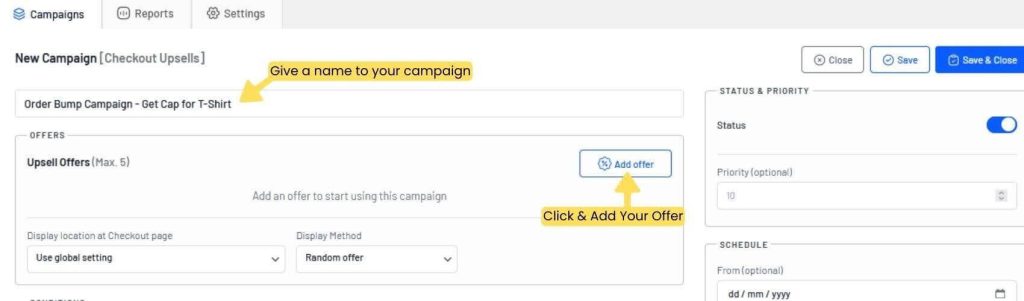
3. Give a name/ title for this campaign for your future reference. Now Click “Add Offer” to create the new order bump for WooCommerce.
4. From the “Offer Details” section, select a product you want to offer as complementary to the main product. Here, I choose the “offer product” as Cap.
5. I choose “Discount Type” as Percentage Discount and “Discount Value” as 50 to offer a 50% discount for the Cap. Click “Add Offer” at the top right corner to add this offer to your campaign.
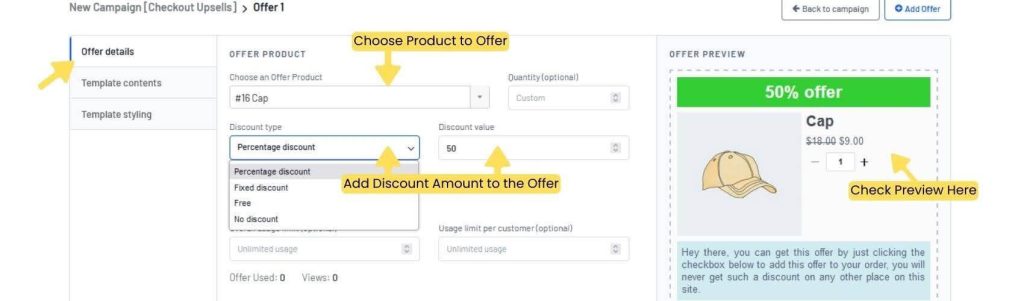
Using the “Offer Preview” option on the right side, you can check how your WooCommerce order bump offers look on the checkout sales page.
With this plugin, you can add up to five offers by selecting the “Add Offer” button above your first offer.
6. Now, choose where and how you want to display your order bump in your WooCommerce store. You can select different display locations to display your offer on the checkout page, like before or after payment gateways.
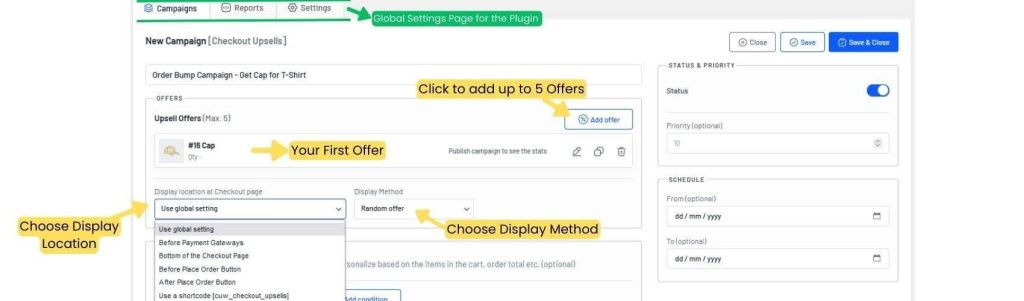
Note: Here, if you choose a “Use global setting” option as the display location, it will take the default display location in the Settings option. To check that, navigate to the global “Settings” page at the top.
7. Now, keep the display method as “All Offers”. It displays all offers. If you add more than one offer, you can choose “Random or A/B Testing” to display random offers from all offers.
8. Click “Choose a Condition” and select “Products in the Cart” and choose a T-shirt to offer Cap only when customers purchase T-shirts.
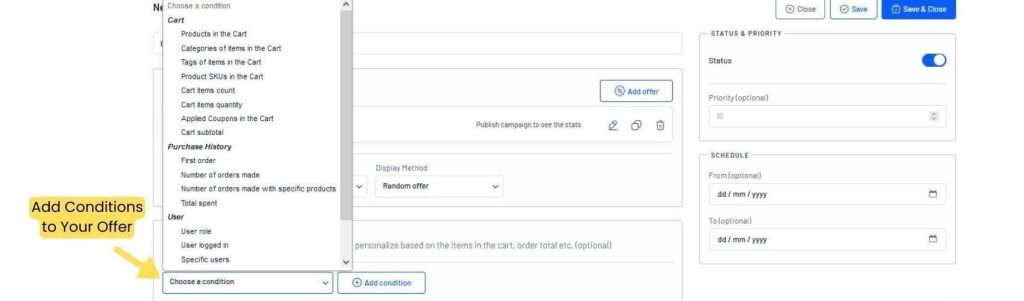
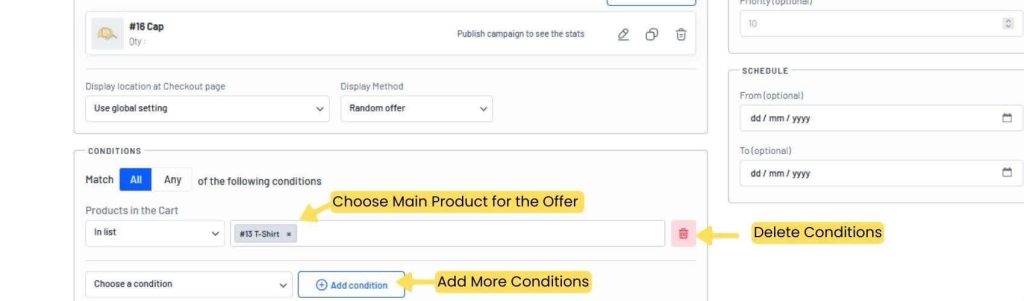
You can also apply multiple upsell order bump offers for WooCommerce based on purchased history or user roles, cart item counts, specific categories, etc.
9. You can also have an optional feature to schedule your campaign time.
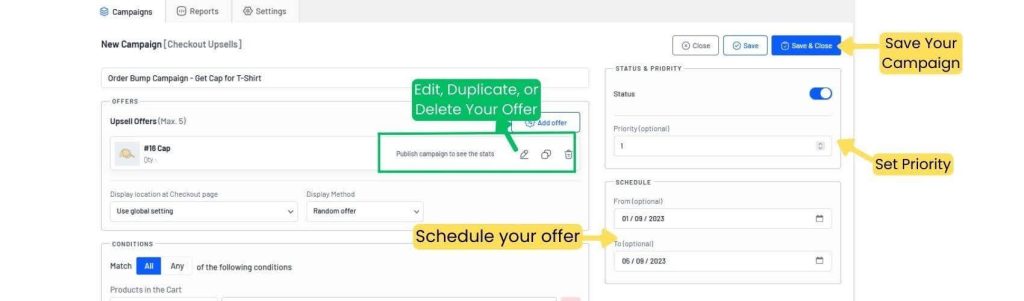
Now save and activate the offer.

In this discount scenario, the cap is available at a low-cost offer that encourages customers to add the product in a click to their total orders.
Recommend Relevant Products As Order Bumps and Boost Your Sales Now With UpsellWP Plugin!
Scenario 2: Offer a free product as an order bump
Example: Offer a free cap when a customer purchases any products from the store.
When adding an offer, select Discount Type as “Free” to offer a free product as a WooCommerce order bump. Here is the reference image for this free product scenario.
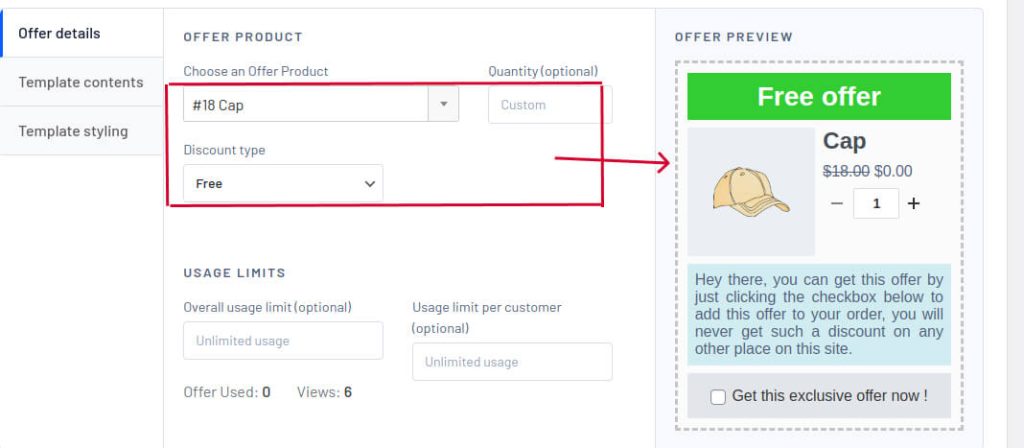
Note: Similarly, you have two other Discount Type options to provide an offer with fixed discount or no discount. Also, with the “Conditions” option, you can offer free shipping using the plugin.
Drum Rolls, please!
We have successfully created the order bump for the WooCommerce checkout page.
You can also create an upsell and cross-sell order bump offer on WooCommerce product and cart pages to increase sales.
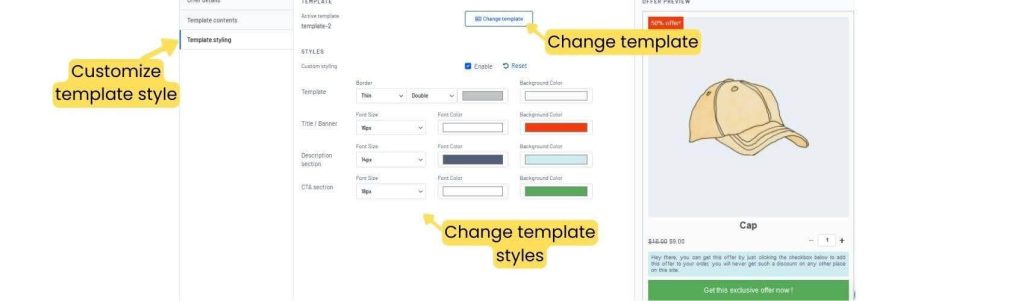
Customizing Order Bump Templates in WooCommerce
In addition to creating the order bump WooCommerce offer, the “UpsellWP” plugin also allows you to customize your offer template and designs.
To customize, click the “Edit (pen) icon” of the respective offers.
- Go to “Template Contents”. Customize your order bump template content – Offer Title, Description, and CTA button text. You can also choose images of your choice.
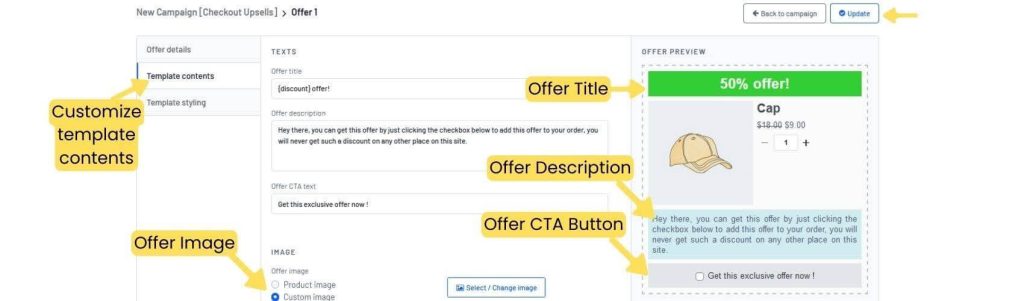
- Go to “Template Styling.” Click “Change Template” to choose a template from multiple template options. Customize your template style based on your interest.
Remember to click “Update” at the top right corner to update all template changes of your offer.
You can check this order bump plugin documentation to know more about this plugin’s features and options.
Best Practices to Follow While Upselling at Checkout
Following these best practices can help you improve your checkout upselling performance:
- Relevant WooCommerce Product Recommendations: Select a complementary product that aligns with the main product the customer is purchasing.
- Grouping Products: Suggest “Frequently Bought Together” products. Product bundles help customers to get an additional product that complements their primary product.
- Positioning: Place the order bump WooCommerce offer prominently on or before the checkout page, preferably right next to or below the main product. It should be visually distinct and catch the customer’s attention.
- Pricing: Price the WooCommerce order bump item reasonably. It should be a valuable addition, and the price should feel like a good deal to the customer compared to buying the item separately. Usually, an order bump is a low-cost offer.
- Highlight Savings: If applicable, show the potential savings or discounts customers get by choosing the order bump offer. It could encourage customers to complete a purchase.
- Testing and Analysis: Monitor the performance of your order bump strategy. Keep an eye on metrics such as conversion rate (the percentage of customers who opt for the order bump), average purchase value, and overall sales. If necessary, tweak your approach based on the data.
Tip: For more effective sales, you can also learn to create one-click upsells on WooCommerce.
3 Real-Time Examples of Checkout Upsells
Let’s see some real-time order bump examples with different offers.
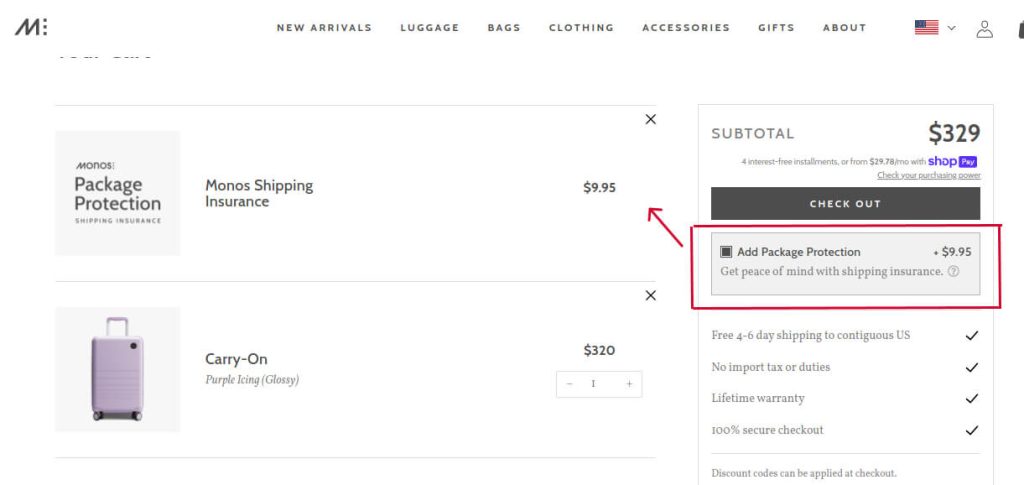
1. Shipping Insurance as Order Bump
Monos, a travel-focused website, specializes in selling travel bags and accessories. It provides one of the best examples of order bumps.
When you shop for a travel bag, they offer you the option to add shipping insurance for an additional $9, a related product that complements your purchase.
To make it convenient, they provide a one-click checkbox so you can quickly include this offer without navigating to other product pages.
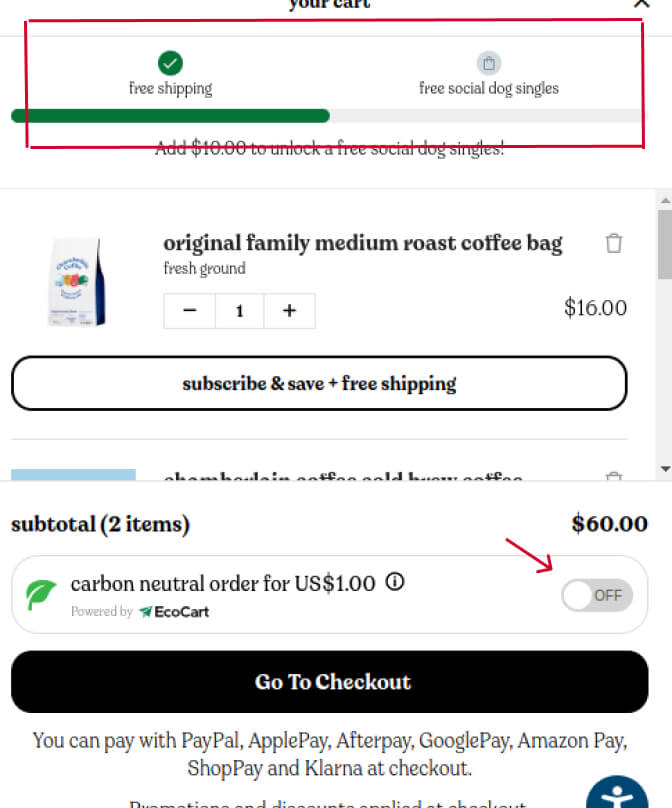
2. Free Products and Shipping as Order Bump
ChamberlainCoffee specializes in coffee, tea bags & accessories. They use a dual order bump strategy, offering free shipping for orders over $50 and free related products for orders over $70.
For instance, when you add a $44 coffee pack to your cart, they prompt you to add another item worth at least $6 to qualify for free shipping. Then, if you add a product exceeding or equal to $70, you can claim free coffee bags. This way, your cart value goes from $44 to $70 in a minute.
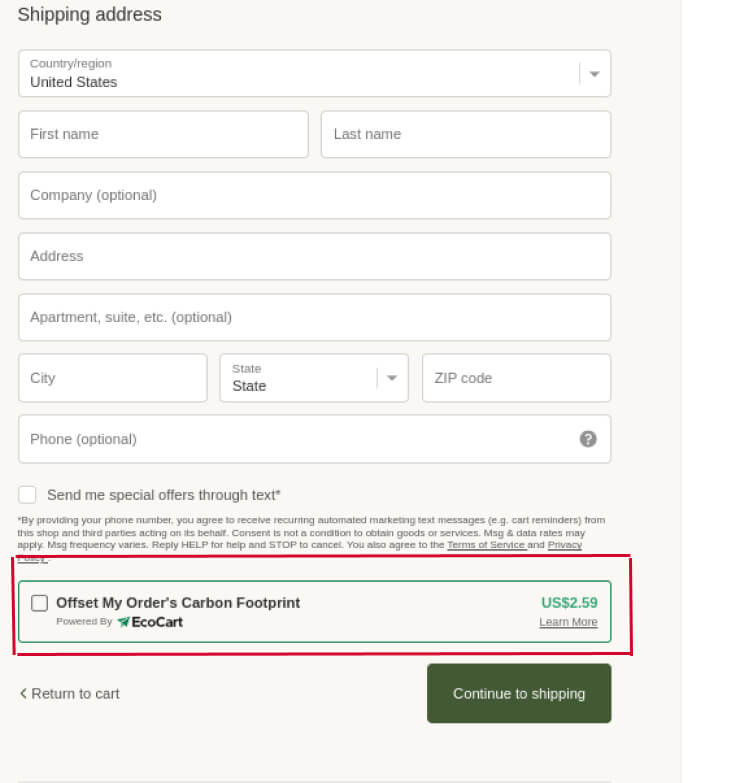
3. Contribution as Order Bump
LivelyRoot sells a variety of plants and employs an order bump strategy to support its eco-friendly Amazon Rainforest Protection program.
When customers shop for plants, they can contribute $2.59 to the program with a simple click. It serves as a great way to motivate customers to add a few extra dollars to their purchases while supporting a worthy cause.
These are a few persuasive ways of using order bump offers in an online store. Let’s see how to add this order bump to your WooCommerce store.
11 Quick-Start Order Bump Ideas for WooCommerce
Now, we will discuss some readily implementable WooCommerce order bump ideas.
- Complementary Products: Offer related products as complementary offers that align with customers’ interests and primary purchases. You can either provide the product for free or at a discount price — for example, a camera bag when buying a camera.
- Free Shipping: Offer free shipping when customers meet the criteria of the cart value — for example, free shipping for orders above $100.
- Fast Delivery: Provide upgrade options for shipping time at a few more dollars —for example, $5 more for quick delivery.
- Customized Products: Enable customization options for products to buy with more options such as colors, size, text engraving, style, etc.,
- Limited Time Offers: Provide order bump offers for a limited time. It creates a sense of urgency to purchase immediately.
- Extended Warranty: Provide extended product warranty or service plan to help customers purchase the product with peace of mind.
- Extra Protection: Like Monos in the above real-time example, you can offer shipping insurance as a complementary offer.
- Contribution: Give customers an option to donate or contribute to your eco-friendly or charitable programs as an add-on to their purchase.
- Installation Service: Offer installation or set-up services for technical or complex products.
- Gift Wrapping: Provide gift wrapping to help customers gift the products to their loved ones.
- Subscription: Encourage customers to subscribe to your subscription or membership programs related to their purchase.
You can implement these ideas easily in your store. With the “Upsell and Order Bump” plugin features, you can create multiple order bumps and offer these products at an original price, discounted price, or even free.
Show Order Bump Offers Effortlessly Using WooCommerce Upsell & Order Bump Plugin and Boost Your Checkout Conversion Rate.
Wrapping Up
Since online shopping is booming, you must implement creative approaches to elevate your brand above competitors.
WooCommerce order bump is the proven strategy to increase your average order value and sales. The one-click offer grabs customers’ attention and enhances their shopping experience.
With this step-by-step guide and the UpsellWP plugin, create your order bump campaign to boost your WooCommerce store revenue.
Also, Check the Best WooCommerce Upsell Plugins and 5 Best WooCommerce Cross-sell Plugins to create your upsell and cross-sell offers.
Frequently Asked Question
An Order Bump in a WooCommerce store increases sales by offering low-cost products as complementary at the checkout process, enticing customers to add more items to their cart. It results in increased orders and sales.
Yes! Order Bumps are a good-to-go sales strategy for all eCommerce businesses that want to increase their average order value.
Complementary products relevant to customers’ main products are the key to success in order bump WooCommerce campaigns. Also, the low-cost products encourage customers to add to their cart without hesitation.
Some eCommerce store owners must improve in order bumps as they make a few mistakes. Mistakes include:
1. Offering high-cost, irrelevant products.
2. Overwhelming customers with too many products.
3. Not testing strategies.
4. Avoid these to get more sales.
To add an order bump feature to your WooCommerce website, you can utilize a plugin such as “UpsellWP” and follow these steps:
1. Go to WordPress dashboard -> UpsellWP.
2. Select the campaign as “Checkout Upsells.”
3. Add your order bump offer and set discounts.
4. Set conditions and activate the offer.
Using a plugin simplifies the process and saves you time and effort, as it allows you to create multiple offers simultaneously and track the results of your campaigns.
An order bump is a pre-checkout offer where customers are presented with additional related products at a discounted price on the checkout page just before finalizing their purchase.
An upsell is an offer that can be presented at both pre-checkout and post-checkout pages, where customers are encouraged to upgrade to a higher-priced or premium version of the product they intend to purchase.
“UpsellWP” is the best WooCommerce order bump plugin.
It helps to create five different order bump offers at once with an option to customize the offer template. Also, it has both free and paid versions.
Bump order, aka order bump, is a sales strategy where online store owners can offer related products at a discount that complements customers’ main product.
The one-click checkbox on the checkout page is an advantage of the order bump offer.
WooCommerce order bump is an effective way to increase your average order value of the store. When AOV increases, it also increases your store’s overall sales and revenue.
Yes, you can customize the order bump offers in WooCommerce using a plugin like “UpsellWP.”
You can add product images and customize the size, style, and color of the description, discount prices, and offer titles. This plugin also provides different templates to ease your process.
The term “Order Bump” is usually used in eCommerce businesses, which refers to a sales strategy to increase AOV and sales of the online store.
The order bump offer encourages customers to spend more on the complementary offer to increase the cart value.