A research report confirms that 47% of customers spend more to reach the minimum order amount to qualify for free delivery deals.
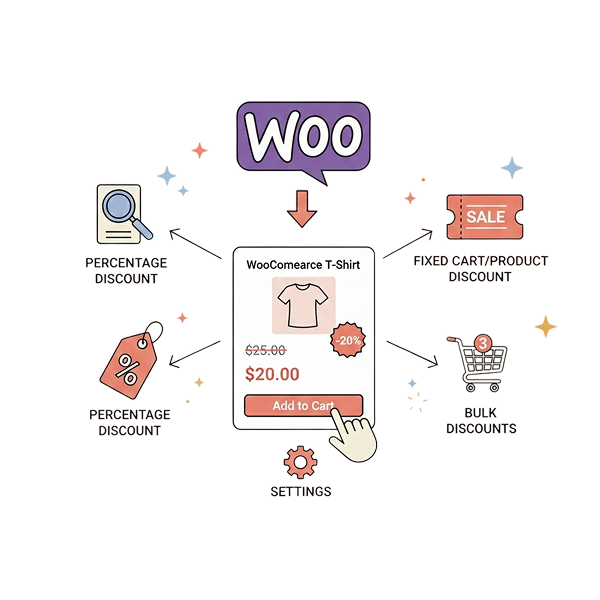
WooCommerce free shipping is one of the best strategies to offset margin losses from discounts and increase average order value.
The term “Free” psychologically triggers customers to buy more products which increases your sales and profits.
As increasing customer satisfaction is an inevitable need, you must learn how to set up free shipping in WooCommerce.
WooCommerce understands this necessity and that’s why it has a default “Shipping” option to create a free delivery option.
In this blog, let’s discuss the six methods to set up WooCommerce free shipping over amount, for specific products, and more using both the default setting and plugin (for advanced shipping features).
Let’s start.
Increase your sales by up to 47% using a free shipping strategy, with or without coupons, through the Discount Rules Pro plugin.
Table of contents
- Why is Free Shipping a Must for the WooCommerce Store?
- When Should You Deliver Products for Free?
- How to Set Up WooCommerce Free Shipping?
- Scenario 1: WooCommerce Free Shipping to Specific Locations
- Scenario 2: WooCommerce Free Shipping Coupon
- Scenario 3: WooCommerce Free Shipping Over Amount
- Scenario 4: WooCommerce Free Shipping for Specific Products
- Scenario 5: WooCommerce Free Delivery to Specific Customers
- Scenario 6: WooCommerce Free Delivery on First-Time Orders
- Troubleshooting Common Issues of the Free Shipping Feature
- Real-Life Examples Of Free Shipping Offers
- Conclusion
- Frequently Asked Questions
Why is Free Shipping a Must for the WooCommerce Store?
Free shipping is essential to increase order value and sales of your WooCommerce store.
Let’s take an example:
Consider online store A, which sells a $25 product with $5 shipping costs, and online store B sells the same $25 product with zero shipping costs.
Which will you choose? Of course, store B to save some additional costs on shipping.
That’s why providing free shipping on the WooCommerce store will highly impact your sales and revenue.
Hence, free delivery can provide benefits in the following ways:
- Increasing average order value and sales.
- Boosting conversions and revenue.
- Enhancing customer experience and loyalty.
- Reducing abandoned carts.
- Acquiring and retaining customers.
When Should You Deliver Products for Free?
Delivering your WooCommerce products for free is a good strategy only when it is offered at the right time to avoid losing revenue.
Here are some strategies on when you should offer free shipping on WooCommerce:
1. Increasing Sales on Specific Days
You can use zero-cost shipping as a promotional strategy to increase sales on particular days or times, such as holiday sales, clearance sales, store anniversaries, or other events.
2. Launching New Products
Launching and driving traffic to your new products is not simple. The products should get visibility and trust from your customers.
You can apply a free delivery offer along with product discounts to increase its sales.
3. Reducing Cart Abandonment
Some customers add products to their carts and leave them once they see shipping charges at checkout. You can provide zero-cost shipping services to make them complete their sale.
4. Acquiring Customers From Specific Locations
Free delivery is the recommended tactic to increase sales in specific regions.
If you are widening your store to particular locations or want to increase sales in specific regions, offer no-cost shipping to those locations. It will urge customers to buy more products with free delivery.
5. Applying Purchase Condition
If you are not able to offer free shipping for all customers to save profit margins, you can set shipping conditions.
You can offer WooCommerce free delivery only when customers reach a certain cart value or apply it only to specific customers. This will increase average order value and customer loyalty.
How to Set Up WooCommerce Free Shipping?
Setting up a WooCommerce free shipping option is possible with both a default feature and a free shipping WooCommerce plugin.
Though the basic free shipping settings enable you to provide no-cost shipping in your store, using a plugin will save you time and effort by making it even easier.
Also, you can set advanced shipping conditions with the plugin.
Let’s create some popular scenarios in both ways, and you can choose the more suitable and easiest way to create and manage your free shipping campaigns.
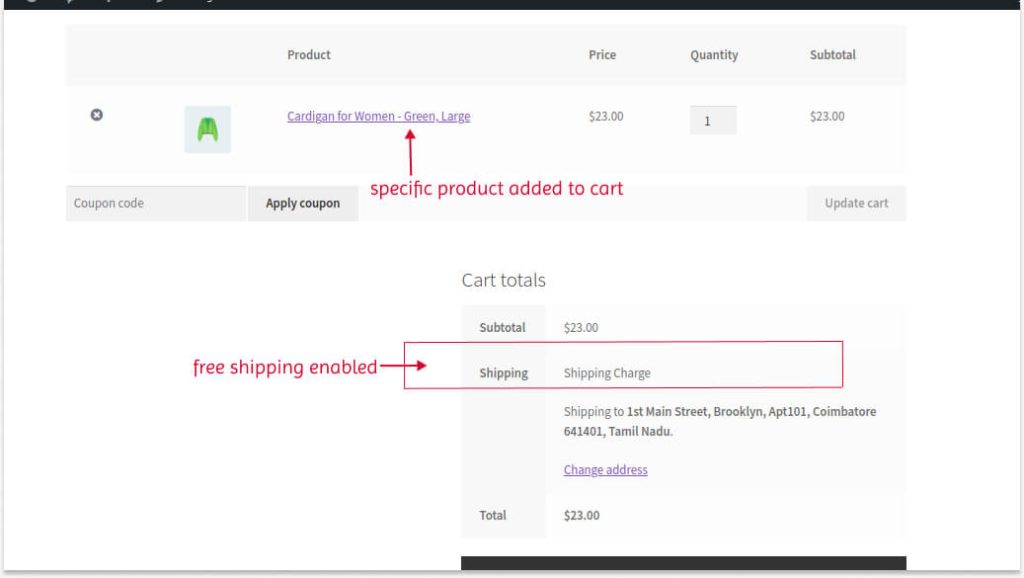
Scenario 1: WooCommerce Free Shipping to Specific Locations
Offering free shipping to specific regions or countries will attract customers, create brand awareness in those places, and boost sales.
In this first scenario, let’s discuss how to offer free shipping to a specific region.
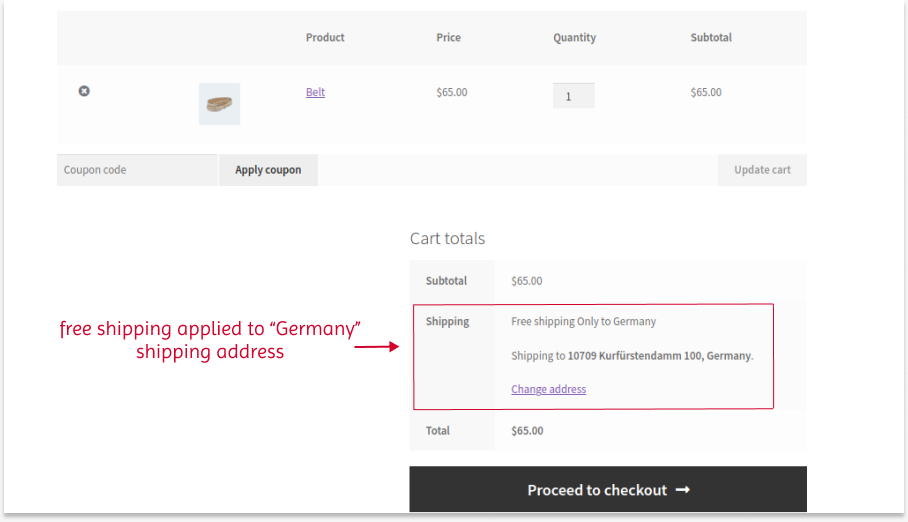
For example, Free delivery on all products. Offer applied only to customers from “Germany”.
(A) Default Settings
To add free shipping in WooCommerce to specific locations using the default settings,
- Open your “WordPress/ WooCommerce” dashboard and navigate to WooCommerce Settings. Click the “Shipping” option.
- Click the “Add Zone” button to add free shipping to specific locations.
- Enter “Zone name” for reference and add the specific zones in the “Zone regions.” Here, I choose “Germany,” which includes all places in this country.

- Click the “Add Shipping Method” and create the shipping method as “free shipping.”
- Create a campaign name and optionally select requirements for free shipping conditions. In this scenario, we will apply zero-cost shipping to all products, so no requirements are set.
- Click “Create and Save.”
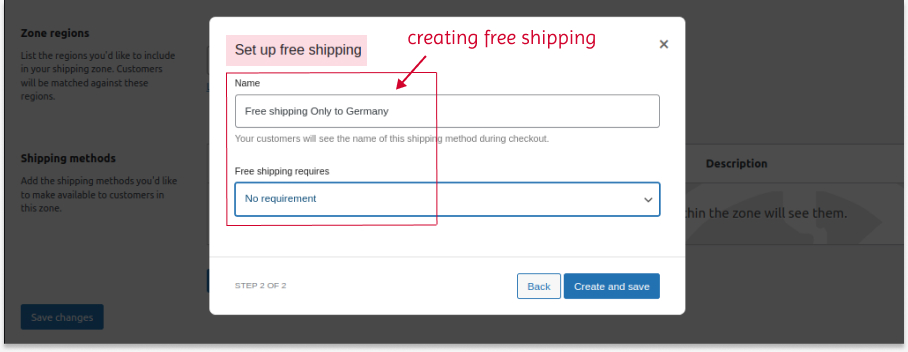
- The overall changes are saved automatically. Now, the free delivery option is only available to customers from all parts of “Germany,” while customers from other countries will have specific shipping charges.
(B) Using Plugin
Using a plugin will be easier and simpler than using the default settings.
While the default settings allow you to set free shipping for specific cities and countries, you can use the plugin to set free delivery for specific countries, cities, states, and even zip codes.
The plugin also allows you to display a custom “free shipping” banner on product pages.
For this guide, we will use the “Discount Rules for WooCommerce -Pro” plugin.
To install this plugin:
- Open your “WordPress” dashboard.
- Go to “Plugins” -> “Add New Plugin.”
- Search for “Discount Rules for WooCommerce -Pro.”
- Click the “Install” button to install and activate the plugin.
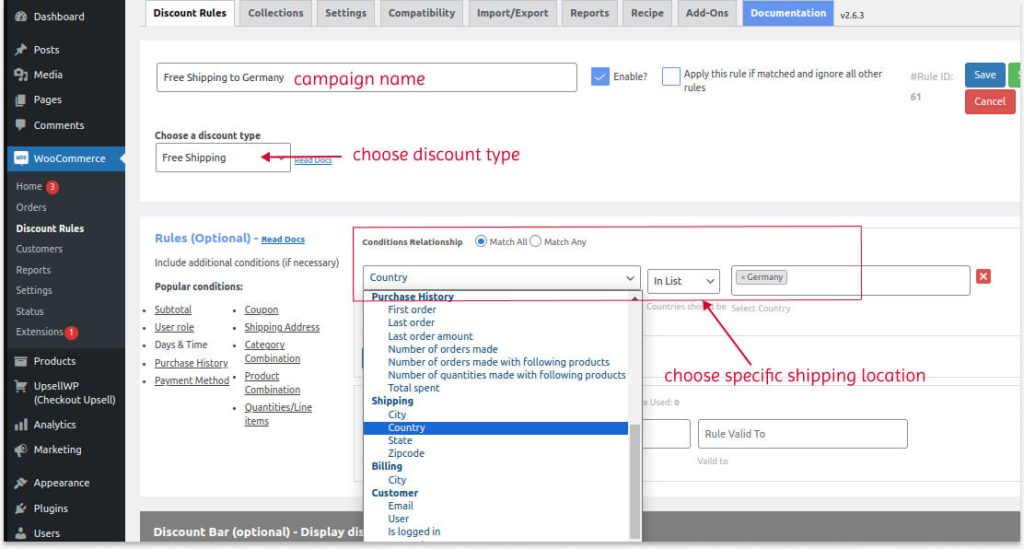
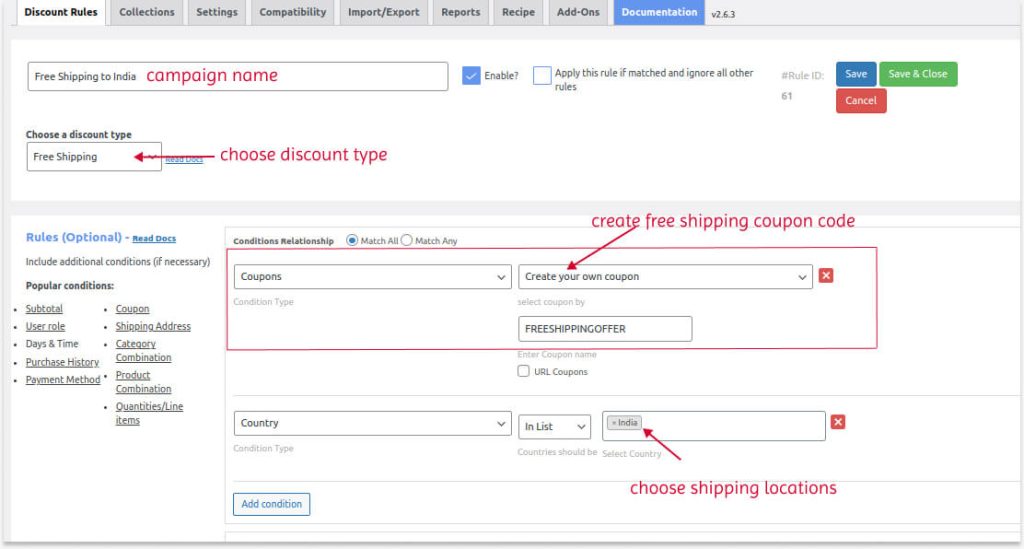
To add free shipping in WooCommerce to specific locations using the Discount Rules Pro plugin:
- Go to “WooCommerce” -> “Discount Rules.”
- Click the “Add New Rule” button.
- Enter the campaign name.
- Choose a discount type as “Free Shipping.”
- Select the specific shipping location in the “Rules” section.
- Finally, save and enable the rule.
That’s it. Free shipping is applied to specific locations.
Changing WooCommerce Free Shipping Bar Text
To display the customized free shipping message badge on product pages, scroll down to the “Discount Bar” section.
- Enable the “Discount Bar” option.
- Customize the text and background color of the badge.
- Enter the custom badge text and save the rule.
- The badge text will be displayed on each product page, which helps you to remind customers about the free shipping offer.
Scenario 2: WooCommerce Free Shipping Coupon
Offering a free shipping coupon code will grab customers’ attention and make them buy products by saving shipping charges.
Let’s look at the steps to create free shipping coupons in WooCommerce.
(A) Default Settings
The default settings need two steps to create free shipping coupons.
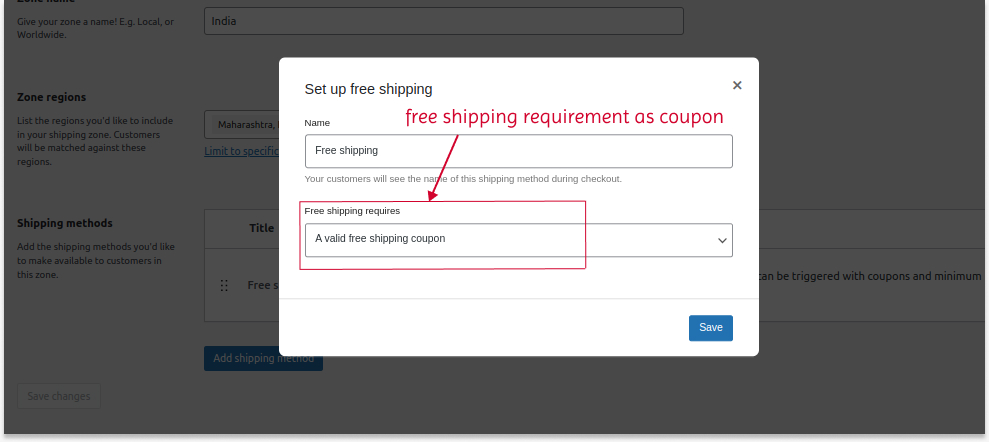
Step 1:
- Go to the WooCommerce “Settings” page.
- Click “Shipping” and “Add Zone.”
- Select specific zone regions to provide free shipping and click “Add Shipping Method.”
- Create a shipping method as “Free Shipping.”
- In the “Free Shipping Requires” box, choose “A valid shipping coupon.”
- Create and save the option.
Step 2:
- Go to “Marketing” and select “Coupons.”
- Click the “Add Coupon” button.
- Create your coupon code.
- Enable the “Allow Free Shipping” option in the “Coupon Data” section.
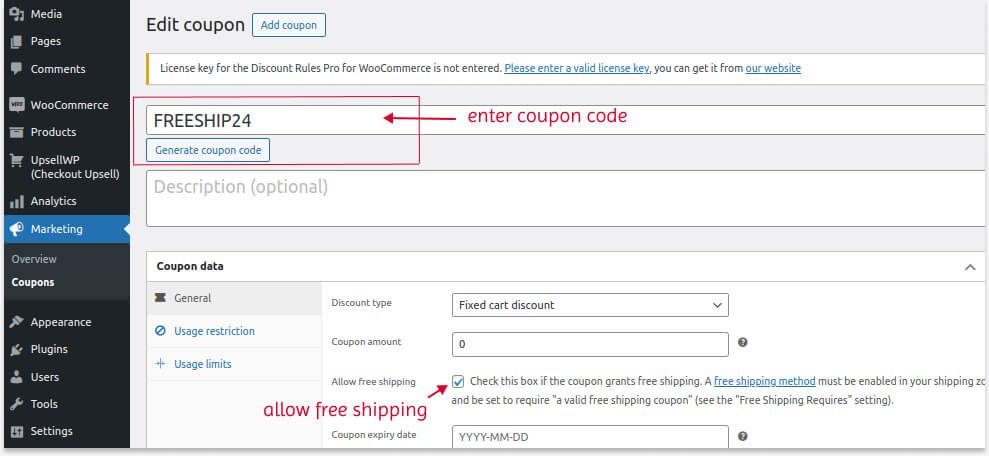
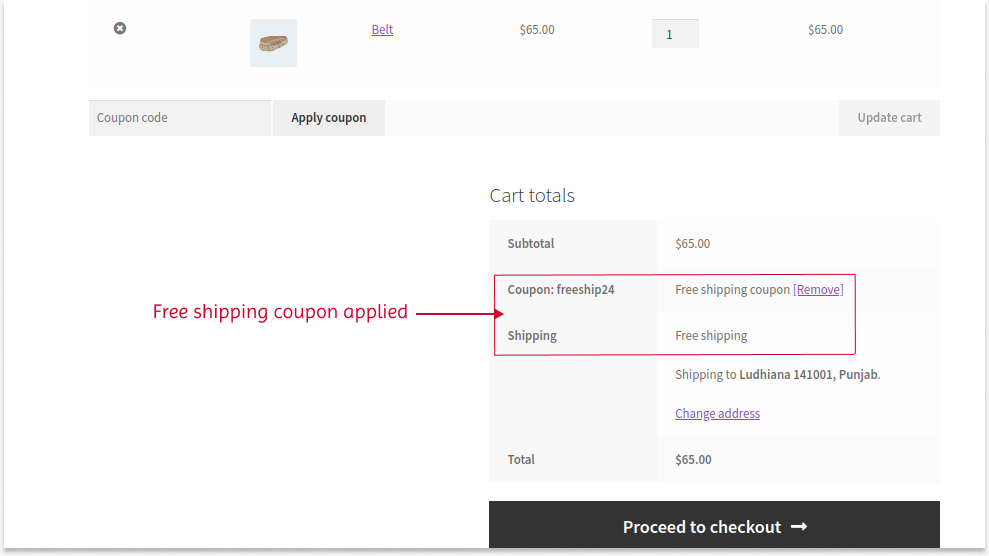
The free shipping option will apply only after setting these two steps. Customers must enter this coupon code at checkout to receive the zero-cost shipping offer.
Isn’t it a long process? Using a plugin will simplify these steps.
(B) Using Plugin
To create free shipping on WooCommerce stores using the plugin:
- Open the “Discount Rules” plugin and add a new rule.
- Choose “Discount Type” as “Free Shipping.”
- In the “Rules” section:
- Select the first condition as “Coupons” and enter the coupon code.
- Select the second condition as “Country/ State/ City” to set the specific locations. You can also set specific zip codes here.
- Finally, save and enable the rule.
Now, the free standard shipping is applied to specific locations when customers enter the coupon code at checkout.
As you can see, using a plugin is very simple to manage free shipping coupon campaigns.
Related Read : WooCommerce Coupons – The Complete Guide With Different Scenarios
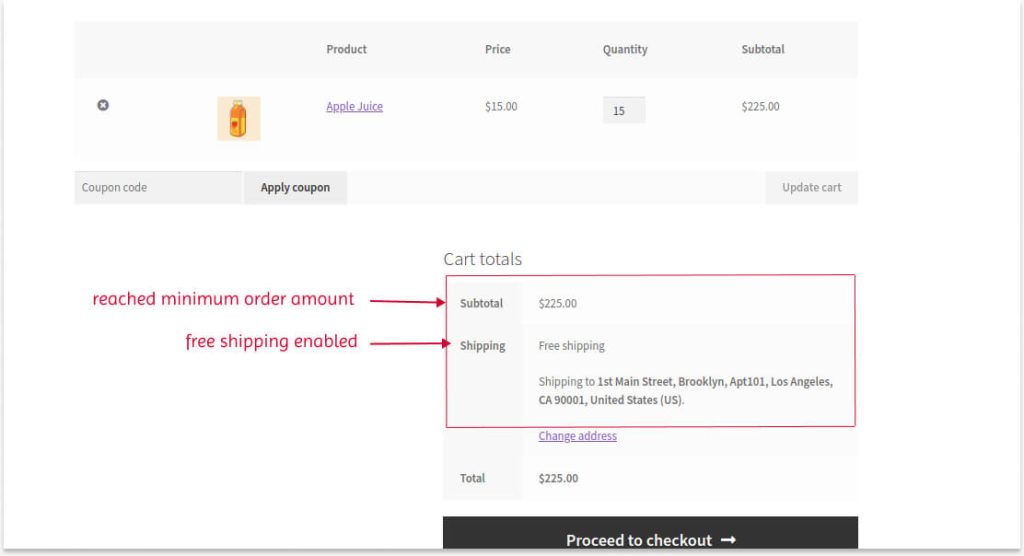
Scenario 3: WooCommerce Free Shipping Over Amount
Offering free delivery only when customers reach a specific cart total is a good tactic to increase order value.
(A) Default Settings
To create free shipping over the amount with the default settings:
- Go to the Shipping page in the WooCommerce settings.
- Add a new shipping zone.
- Select specific zones and select the shipping method as “Free Shipping.”
- Set “Free Shipping Requires” to “A Minimum Order Amount” and enter the cart value that customers must reach to qualify for free shipping.
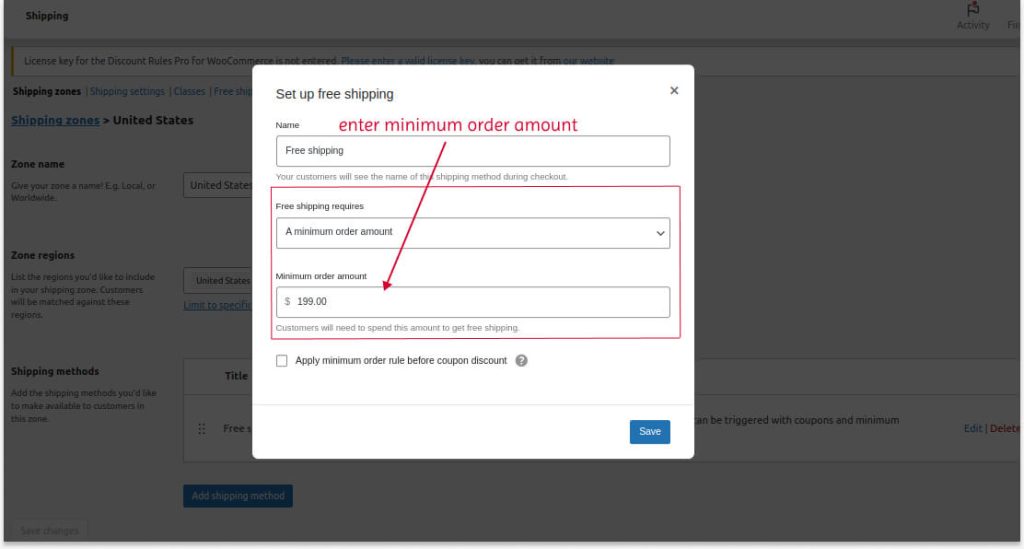
Free shipping will be offered once the customer reaches this specific order amount.
(B) Using Plugin
Using a plugin to create a free delivery option based on order amount has a great advantage that urges customers to add more products to their cart.
To create a free shipping over amount using the plugin:
- Open the “Discount Rules” plugin and add a new rule.
- Choose “Free Shipping” as the discount type.
- In the “Rules” section, select the condition “Subtotal” and enter the minimum cart total.
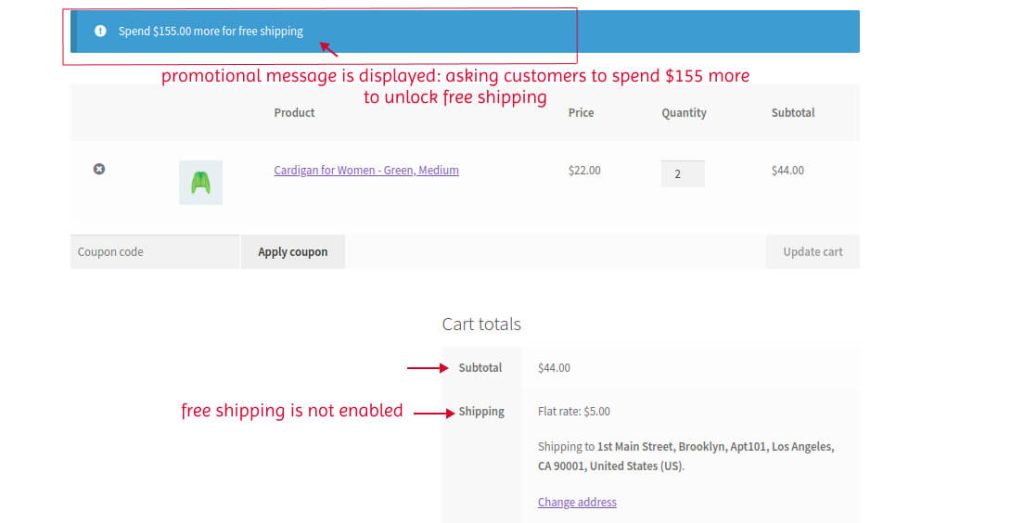
Here is the advantage: The plugin lets you display a promotional offer message that reminds customers to spend the remaining amount to reach the cart total.
- In the “Promotion Message,”
- Set the “Subtotal from” amount to start displaying this message.
- Customize your message.
- At last, save and enable the rule.
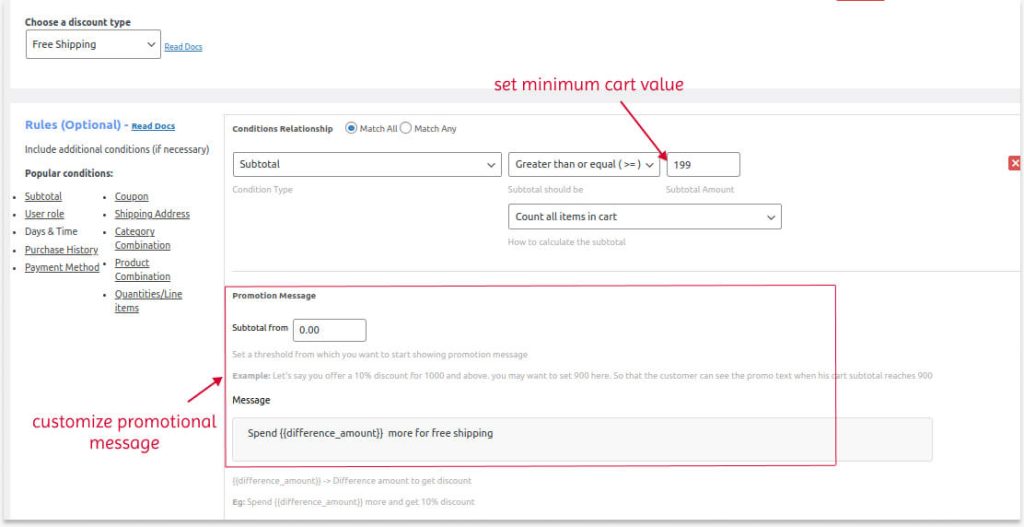
When customers only have a minimum cart amount, a promotional message will be displayed to encourage them to reach the specific cart value.
It is an amazing feature to remind customers about spending more for free standard shipping.
Offer WooCommerce free shipping over the amount using the Discount Rules plugin to increase order value & conversions.
Scenario 4: WooCommerce Free Shipping for Specific Products
Instead of applying free shipping to all products in the store, offering it only to specific products will increase its visibility and sales. This method is suitable for new products and slow-selling products.
(A) Default Settings
To create free shipping on WooCommerce for specific products using the default settings, you need to set three steps.
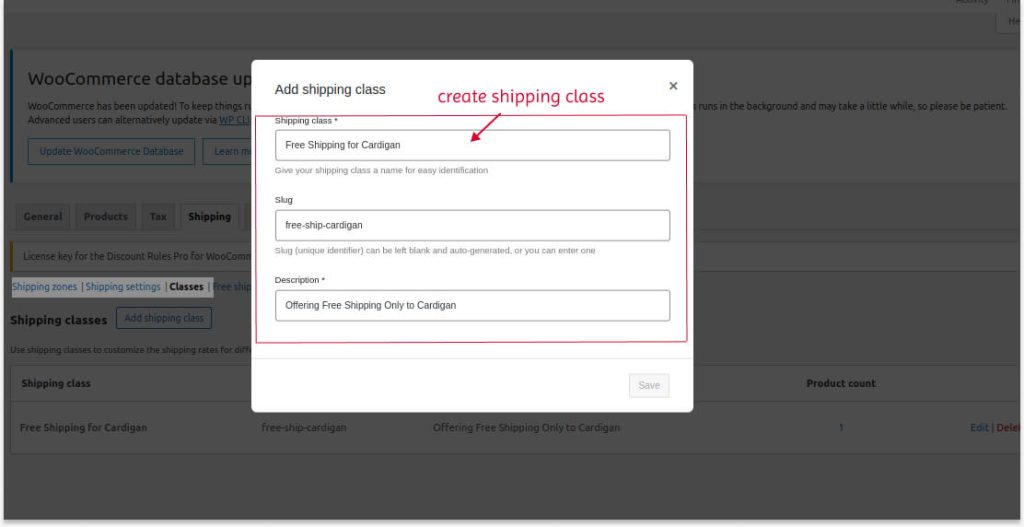
Step 1: Creating A Shipping Class
- Go to WooCommerce settings -> “Shipping.”
- Navigate to “Classes” and click “Add Shipping Class.”
- Create a class name with a slug and description. Save it.
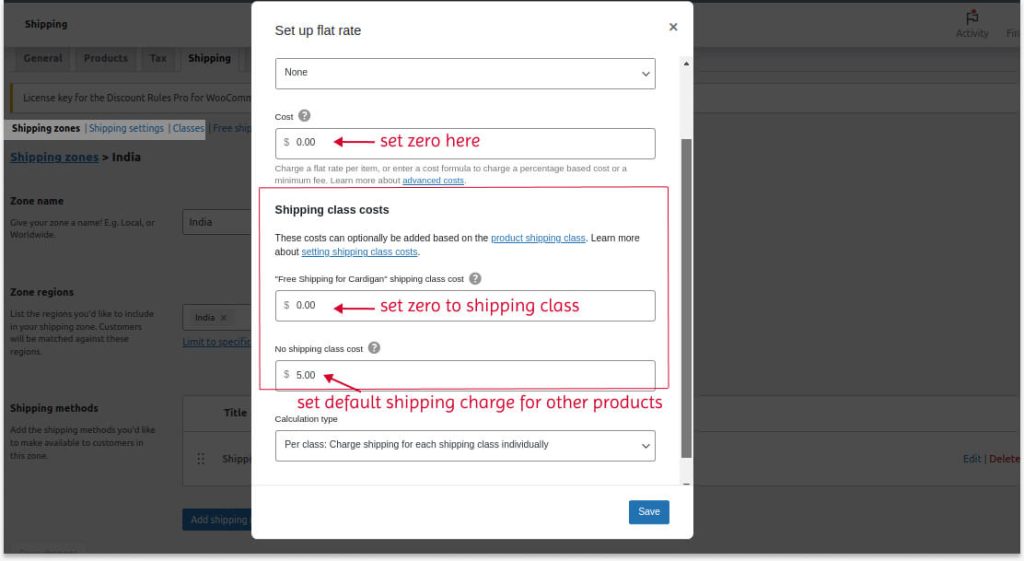
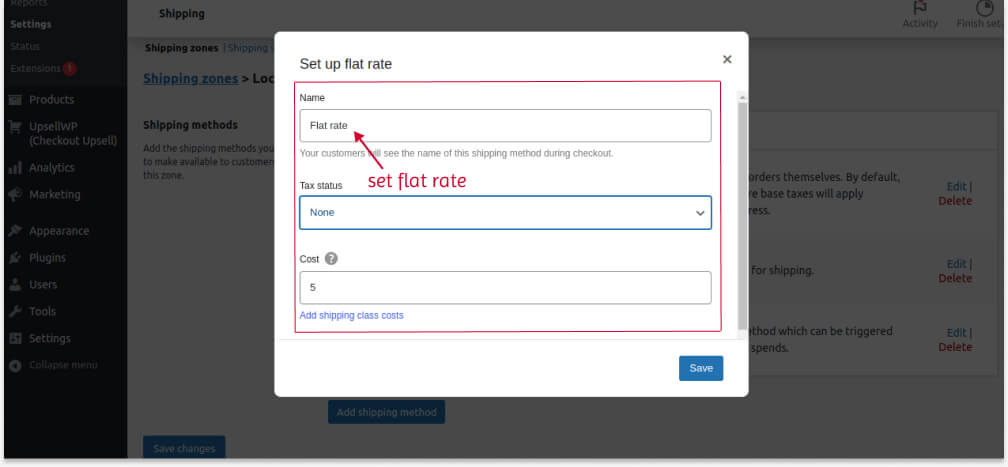
Step 2: Setting Shipping Costs
After creating a new shipping class,
- Go to “Shipping Zones.”
- Add a new zone and select specific zones.
- Add a shipping method as “Flat rate.”
- Enter the “Name” for reference.
- Setup the flat rate as follows:
- Set the original costs to Zero.
- In the “Shipping Class Costs,” set the created shipping class as Zero.
- Set the shipping charge to “No Shipping Class Costs.”
- Lastly, save it.
Step 3: Choosing Specific Products
After completing these two steps, go to “Products.”
- Select the specific product that you want to offer free shipping.
- Scroll down to “Product Data.”
- In the “Shipping” section, select the specific shipping class name.
- Update it.
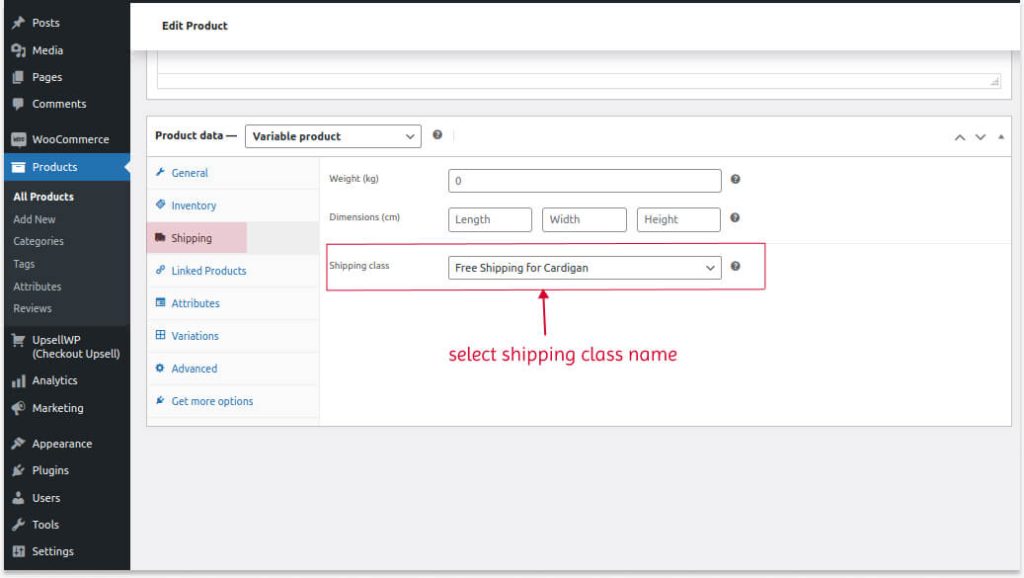
Free delivery option is enabled for specific products only after setting these three steps.
Similarly, you want to edit each product and choose “Shipping Class Name” to apply free delivery for products.
It is inconvenient to edit each product every time to edit or delete free shipping classes.
So, you can use a plugin to easily provide shipping at zero cost for specific products.
(B) Using Plugin
Instead of choosing each product, WooCommerce free delivery will be enabled when certain products are available in the customers’ cart.
To offer free shipping for certain products in WooCommerce:
- Go to “WooCommerce” -> “Discount Rules.”
- Add a new rule.
- Choose the discount type, “Free Shipping.”
- In the “Rules” section, select the condition “Products” and choose the necessary products that customers should include in their cart to enable free shipping. Also, set the quantities of those products.
- At last, save and enable the rule.
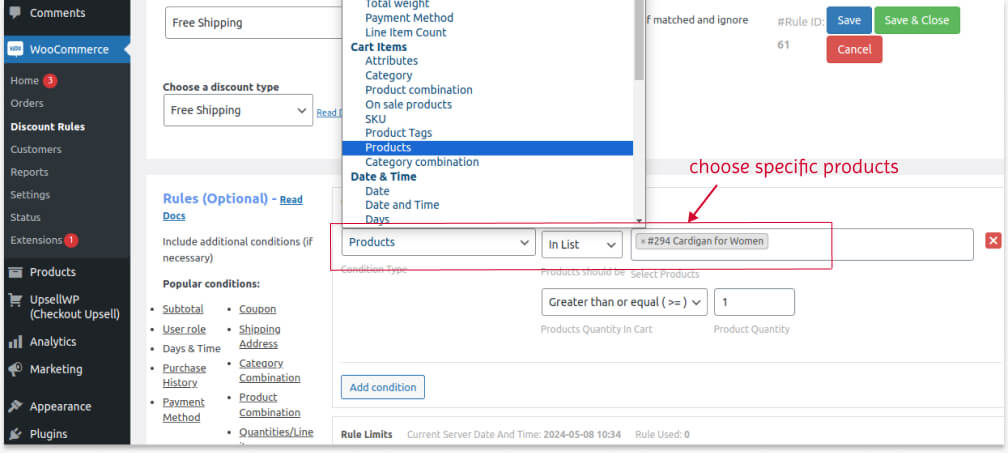
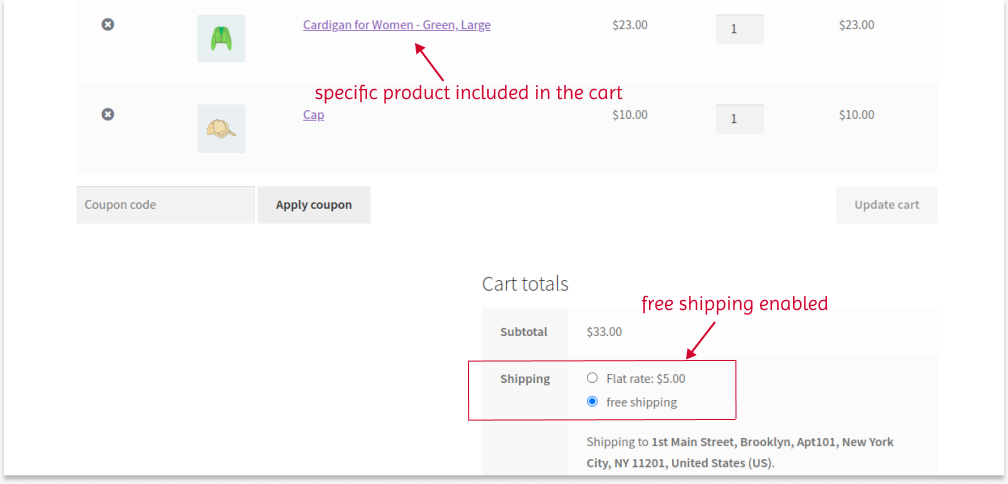
For example, I set “Cardigan” as the “Product.” Free shipping applies only when the cardigan is in the cart.
Not only for products, you can also create this WooCommerce free delivery offer for specific product categories, tags, attributes, SKUs, and product combinations, where the cart includes products as per combination condition.
These are the four popular scenarios that you can create either with default features or using a plugin.
However, there is an advantage to using plugins in every scenario!
The WooCommerce default shipping feature missed some more scenarios, but the plugin helps you achieve them.
Let’s check two such scenarios that are only possible using the plugin.
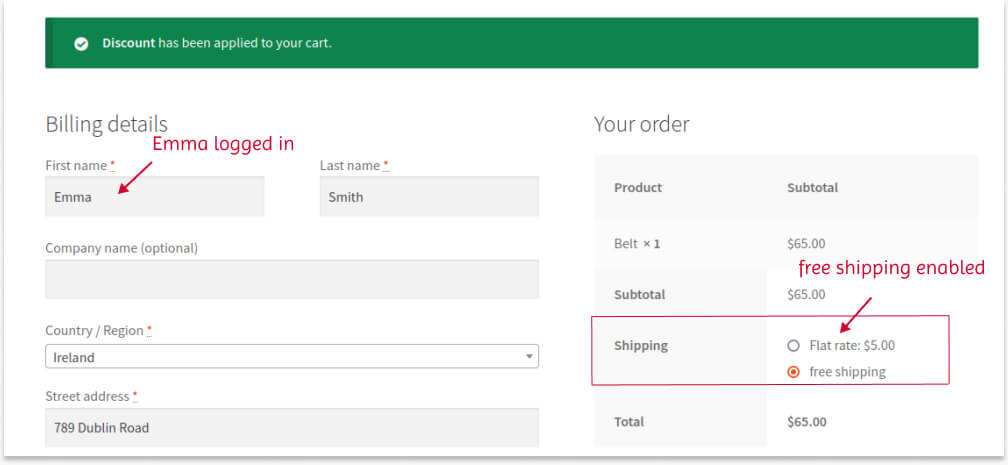
Scenario 5: WooCommerce Free Delivery to Specific Customers
You can only deliver products for free to specific customers to reward their loyalty to your brand.
To set up free shipping in WooCommerce to specific customers:
- Go to “WooCommerce” -> “Discount Rules.”
- Add a new discount rule.
- Choose a discount type, “Free Shipping.”
- In the “Rules” section, select the condition, “User” and select customers to whom you want to provide free shipping.
- Finally, save and enable the rule.
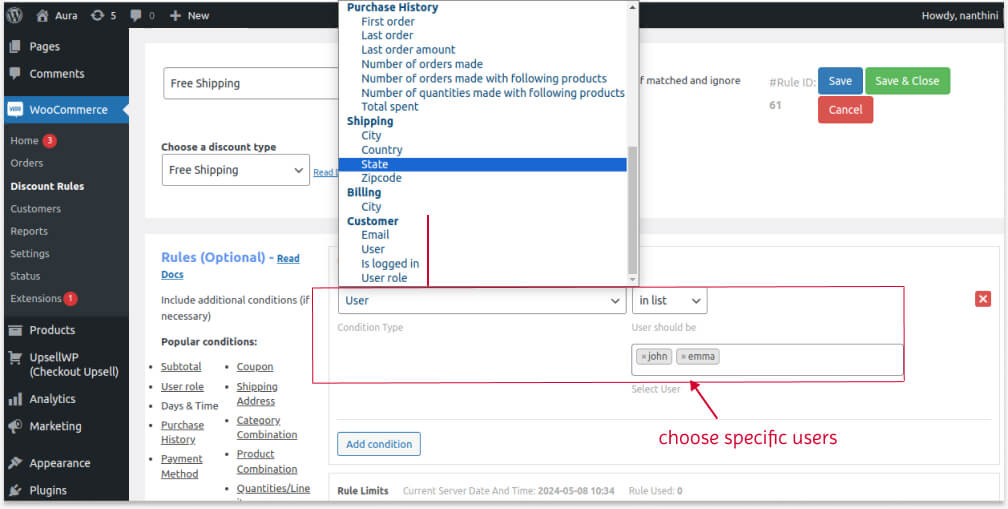
As you can see in the image, you can also provide free delivery to specific user roles, such as regular customers, VIP customers, wholesale dealers, and more. You can also filter specific customers by their email address.
When the specific customer logs in to the store, free shipping will be enabled.
This Discount Rules plugin also allows you to offer free shipping based on a customer’s number of purchases.
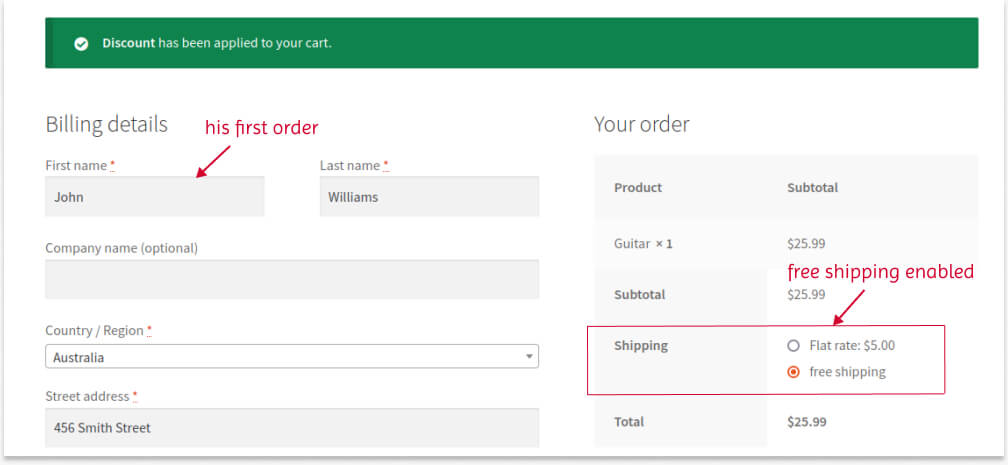
Scenario 6: WooCommerce Free Delivery on First-Time Orders
Many popular brands, such as Amazon, Nykaa, and more, are using this free standard shipping tactic to encourage first-time customers to make a sale and become regular customers.
Only using the plugin, here is how you can offer a free delivery deal to first orders:
- Go to “WooCommerce” -> “Discount Rules” -> “Add New Rule.”
- Choose the discount type, “Free Shipping.”
- In the “Rules” section, select the condition type as “First Order” and set “Yes.”
- Finally, save and enable the rule.
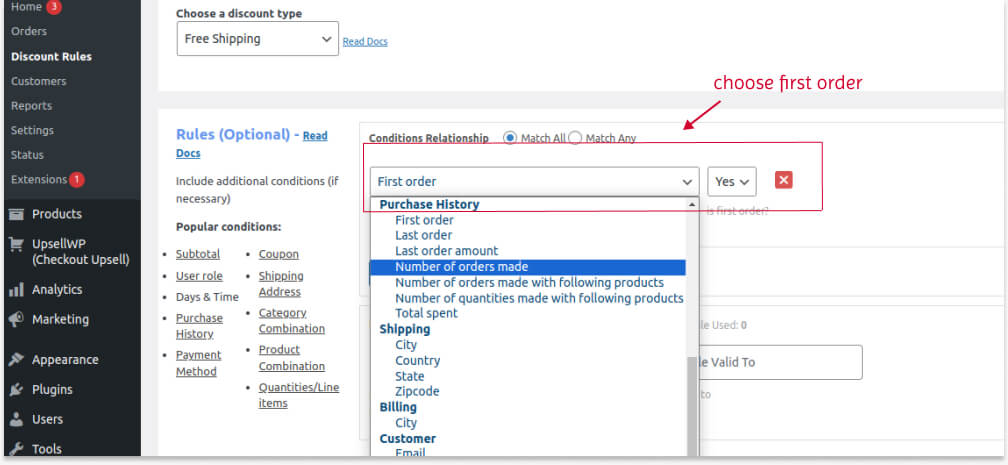
When first-time customers log in, they can get free delivery on their first order.
Similarly, you can provide free shipping based on their purchase histories, such as the last order within specific days, the number of orders made to date, and more.
The Discount Rules plugin also allows you to create free shipping based on:
- Specific time and days – After the set date, the offer will expire.
- Total cart item quantity
- Specific payment methods, and more.
You can also set rule limits and schedule campaigns in advance with the help of this plugin.
Thus, implementing these free shipping campaigns will help you attract customers and increase order value and sales.
Related Read: How to provide first-order discounts in WooCommerce?
Troubleshooting Common Issues of the Free Shipping Feature
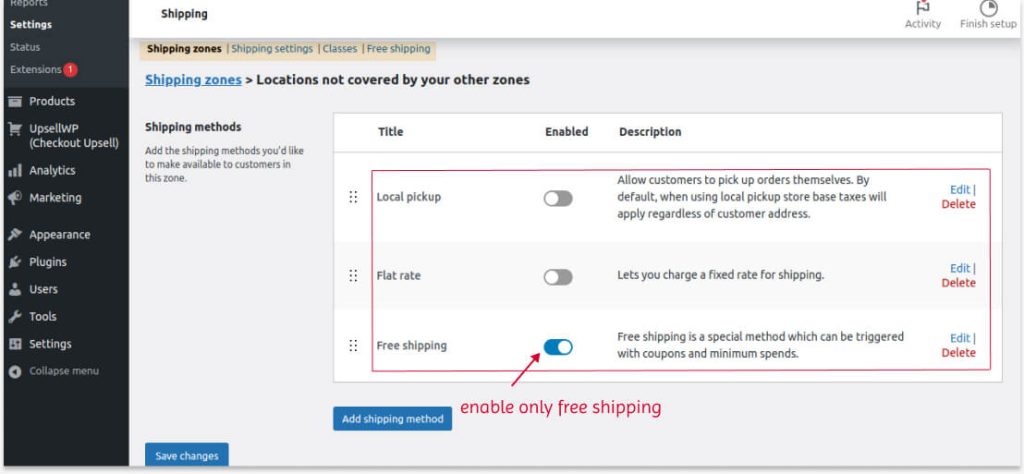
Issue 1: How to Hide Other Methods When WooCommerce Free Shipping is Available?
Hiding other shipping methods is important to highlight free shipping.
As you can see from the above image, even though free delivery option is enabled, the flat rate is also shown, which will confuse customers.
To hide other methods,
- Go to the ‘Shipping’ page of WooCommerce settings.
- Edit the shipping zone. Disable all the shipping methods, such as flat rate and local pickup, and ensure that only free shipping is enabled.
By doing so, you can hide other shipping methods and only show the free shipping option.
If you are using the plugin to create a free delivery offer, you can also disable this free shipping option in the settings, as you have already enabled it in the plugin.
If you’re using a plugin-based approach to manage free shipping, it’s also worth reviewing how other shipping methods are shown at checkout. For example, PH Hide Shipping Methods & Rate Adjustment for WooCommerce allows store owners to automatically hide options like flat rate or local pickup when free shipping becomes available, helping to avoid customer confusion.
Issue 2: No Default Shipping Method
If you haven’t created shipping methods yet, it will show a message like “No shipping options were found.”
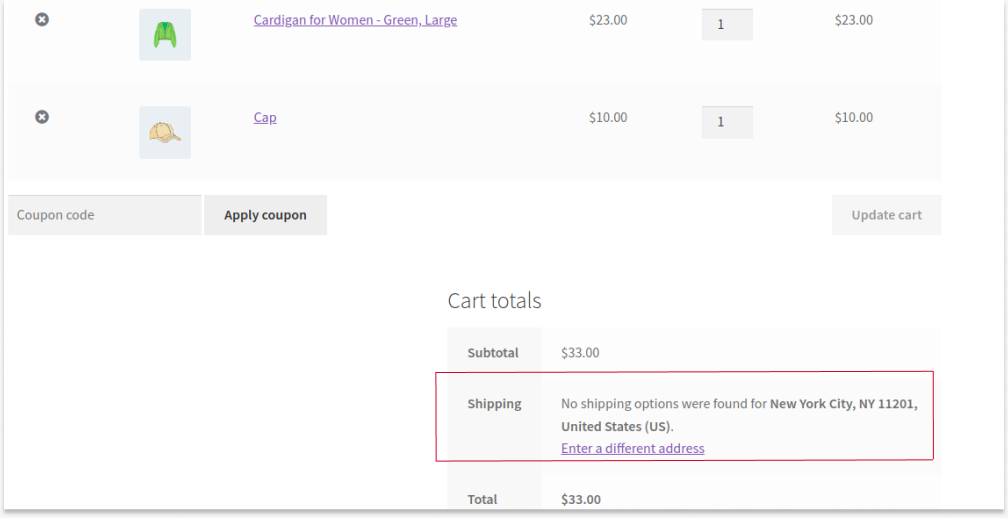
Hence, go to the “Shipping” page of the WooCommerce settings.
- Add a new zone and create your free shipping to specific zones, as discussed in the above scenarios.
- Then, on the “Shipping Zone” page, edit the “Rest of the World” option.
- The default setting will allow you to create three shipping methods:
- Local Pickup: Allows customers to pick up their orders themselves.
- Flat Rate: The common shipping charges.
- Free Shipping.
- Since you have created free shipping for specific zones, either enable local pick-up or flat rate options.
So, the other products that are excluded from free shipping settings will display this shipping method.
Issue 3: WooCommerce Free Shipping and Coupon Are Not Working
If you are using the default settings to create free delivery option, and it is not working:
- Open the “Shipping” page.
- Go to “Shipping Settings.”
- Ensure that necessary shipping options are enabled.
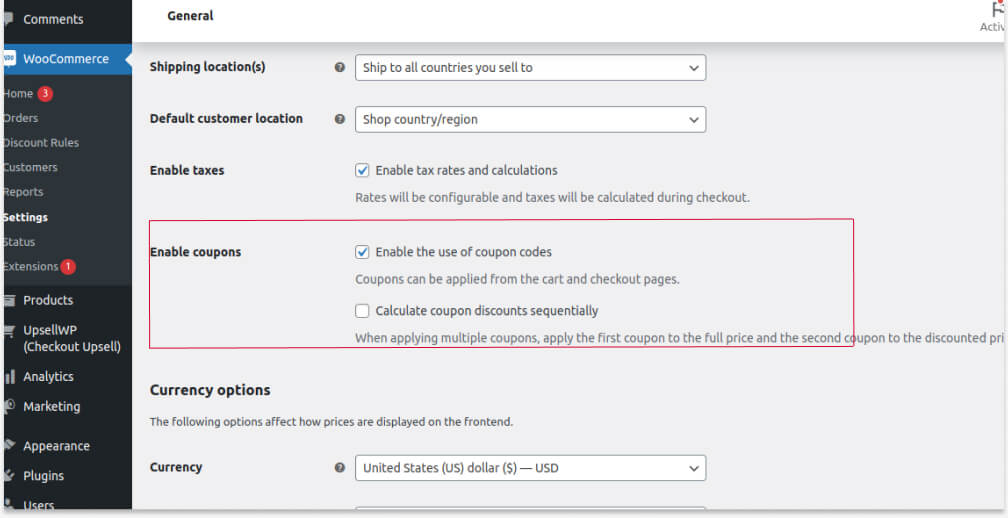
If you are using a free shipping coupon with the default settings, you can ensure that the default coupon option is enabled in the settings.
- Go to the “General” page in the WooCommerce settings.
- Scroll down to “Enable Coupons.”
- Tick off the box to enable the default coupon option.
Issue 4: Why is my shipping method not showing in WooCommerce?
If you are using the default WooCommerce shipping feature, it may not work for several reasons:
1. Make sure to enable the necessary settings in “Shipping Settings.”
2. Update the WooCommerce version to its latest.
3. If you are using a free shipping coupon, ensure that you enable the “coupon” option in the “General” settings.
If you are using the “Discount Rules” plugin:
1. Ensure that you have the latest version of the plugin.
2. Check whether you enable the necessary campaigns and save the conditions.
3. If a problem still occurs, contact our support team to solve your issues immediately.
Other Common Issues
- How do I turn off all shipping in WooCommerce?
To turn off all shipping in WooCommerce, check the following two steps:
Step 1: Check Default Settings
1. Go to the “Shipping” page in the “WooCommerce Settings.”
2. You can delete all the zones on the “Shipping Zones” page. But, if you want it for future campaigns, simply edit the specific zone and disable shipping methods.
Step 2: Check Plugin
1. If you are using the “Discount Rules” plugin to create free shipping, open the plugin and disable the particular rule to turn off free shipping methods.
- How do I make shipping optional in WooCommerce?
You can make shipping optional in WooCommerce by:
1. Open the “Shipping” page.
2. Edit specific shipping zones.
3. Enable all three “Local Pickup/ Flat Rate/ Free Shipping” shipping methods.
4. Save changes.
All these three options are shown at checkout and customers can choose their preferred shipping methods. Of course, free shipping is the most picked one, so instead of it, enable the remaining two options to avoid losses in revenue.
- How do I remove shipping charges in WooCommerce?
1. Open the “Shipping” page of the WooCommerce Settings.”
2. Edit the particular zone to remove shipping charges.
3. Disable the “Flat Rate” shipping method to remove shipping charges in WooCommerce.
These are the most common issues faced by store owners. You can easily solve them with these steps.
If you have any other queries, contact our support team. We will solve your problems quickly.
Customize free shipping banner text and style easily using the Discount Rules plugin and Attract More Customers.
Real-Life Examples Of Free Shipping Offers
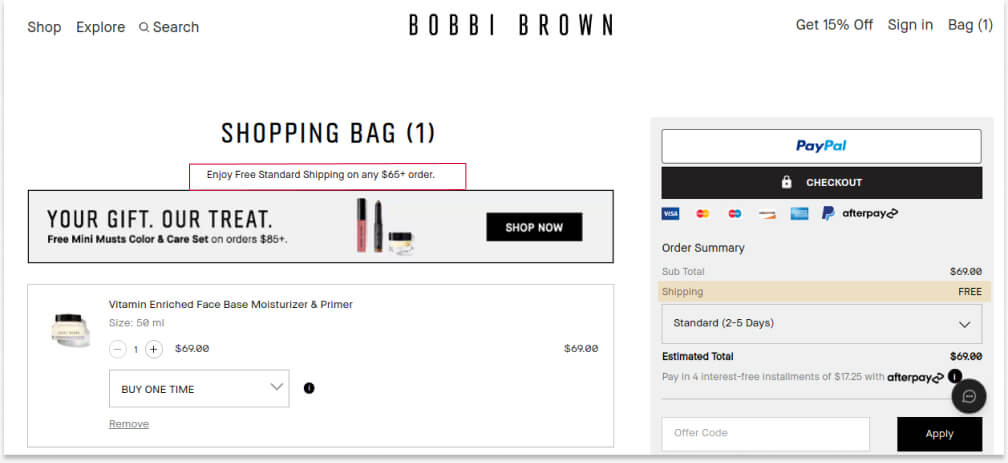
1. Bobbi Brown
Bobbi Brown, one of the most popular cosmetics brands in the world, offers free delivery on orders over $65.
This “minimum amount spent” condition helps this brand to increase its average order value.
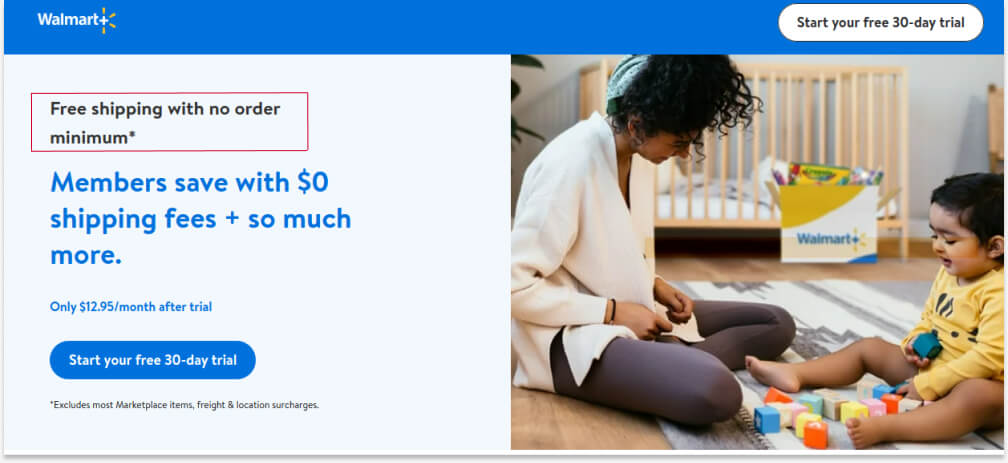
2. Walmart
Walmart, another popular retail brand provides free delivery on a subscription method.
When customers become their regular subscribers, Walmart provides free delivery even for small orders.
This tactic helps Walmart to convert one-time buyers into loyal subscribers and make repeat sales.
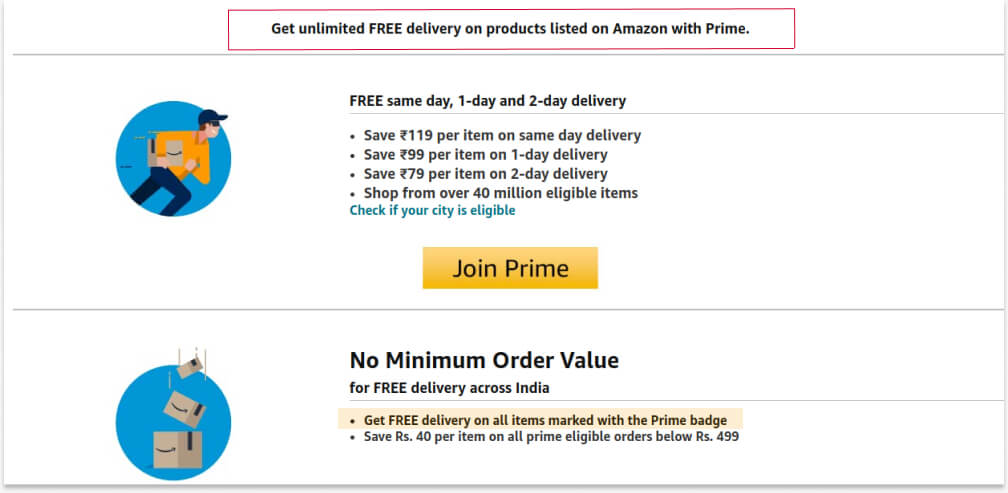
3. Amazon Prime
As we all know, Amazon has a Prime subscription service which offers more benefits when shopping on Amazon.
Free delivery is one of the benefits included in Prime, where no minimum order amount is required.
Also, it uses a dynamic pricing tactic for normal shipping charges based on the number of days within product is delivered.
It helps Amazon to get more loyal customers and increases the additional costs of shipping.
Brands have also proven that providing free delivery on orders is a great way to drive more customers and increase sales.
Offer free shipping to specific customers or locations using the Discount Rules plugin to reduce cart abandonment rates and increase sales.
Conclusion
As we discussed, 50% of customers abandoned their carts because of additional shipping charges.
Customers always fear hidden costs at checkout, and providing free delivery deal may help them continue the sale without doubting about additional charges.
Offering WooCommerce free shipping on all products is a good start, but you have to increase your ROI.
Hence, offering strategic free delivery deals, such as on first orders, minimum amounts spent, specific locations, or customers, will be a recommended tactic to increase your revenue.
You can also use “Discount Rules for WooCommerce -Pro” to simplify the process.
Few More Guides to Increase WooCommerce Sales
- How to Provide Advanced Discounts in WooCommerce?
- How to Offer a WooCommerce Buy One Get One (BOGO) Deal?
- How to Create Bulk Discounts in WooCommerce?
- How to Auto-apply Coupons in WooCommerce? (Also included the free shipping scenario)
Frequently Asked Questions
WooCommerce free shipping is a sales strategy where customers can buy the products with zero shipping costs. This tactic urges customers to buy products from the store and helps you increase order value and sales.
To enable shipping charges in WooCommerce:
1. Go to “WooCommerce” -> “Settings -> “Shipping.”
2. Edit the specific zone to enable shipping charges.
3. From the three shipping methods available (Local Pickup, Free Shipping, and Flat rate), enable flat rate to provide shipping charges in WooCommerce. Edit it to set the fixed shipping cost.
4. Finally, save changes.
To add a free shipping bar in WooCommerce, you have to use a free shipping WooCommerce plugin like Discount Rules for WooCommerce -Pro.
1. Install and open the “Discount Rules” plugin.
2. Add a new rule and select a discount type as “Free Shipping.”
3. Optionally set purchase conditions in the “Rules” section to apply free shipping.
4. In the “Discount Bar” section, enable the “Show Discount Bar” option and customize the bar’s content and color.
5. Save the rule.
It will display a free shipping bar on all WooCommerce product pages.
You can find the shipping settings by navigating to the WooCommerce settings page. Click “shipping” and open the “shipping settings” page.
Open “Shipping settings” by navigating to the “Shipping” page of the WooCommerce settings.
From there, you can enable or disable or make necessary changes to your shipping settings to accomplish your shipping goals.